Shaping was the skill that took me the longest to learn. I could manage fermentation, I could score, I could bake — but for the first year, every loaf came out of the oven looking like it had given up on itself. Flat. Spreading. No structure. The problem was always shaping.
Over 11 years and thousands of loaves — including three years of microbakery production where bad shaping meant lost income — I’ve developed a reliable approach to shaping both boules and batards. This guide covers everything I wish someone had told me on day one.
Why Shaping Matters More Than You Think
Shaping isn’t just about aesthetics. When you shape sourdough properly, you’re creating surface tension — a tight outer skin that holds the dough’s structure during the final proof and the first minutes of baking. Without that tension, the dough relaxes outward instead of springing upward in the oven. You get a flat disc instead of a tall, domed loaf.
Good shaping also organizes the gluten network you built during bulk fermentation. Think of it as the final architectural step — you’re arranging the structure so that when the gases expand in the oven, they push the loaf up rather than out. Every flat loaf I’ve ever baked can be traced back to either underfermentation or weak shaping. Usually shaping.
Pre-Shaping: The Step Most Beginners Skip
Pre-shaping is a light, preliminary shaping done 15 to 25 minutes before the final shape. It’s the step I skipped for my entire first year, and it’s the step that made the biggest immediate difference when I finally started doing it.
Here’s why it matters: when you dump your dough out of the bulk fermentation container, it’s a loose, sticky mass. If you try to go straight to a tight final shape, the dough fights you — it’s too relaxed, the gluten resists, and you end up either tearing the surface or failing to create tension.
Pre-shaping gives the gluten a gentle wake-up call. You create a rough round, let it rest, and the gluten relaxes just enough that the final shape goes smoothly.
How to Pre-Shape
- Flour your work surface lightly. Turn the dough out onto it.
- Using a bench scraper and one hand, gently pull the dough toward you while tucking the far edge underneath. Rotate 90 degrees and repeat 3 or 4 times until you have a rough ball.
- Don’t worry about perfection here. You want a loose round with some surface tension — not a tight ball.
- Let it rest uncovered for 15 to 25 minutes. The dough should relax and spread slightly but not completely flatten. If it pancakes, your dough is either overfermented or too wet for your skill level.
During my microbakery years, I pre-shaped 12 to 15 loaves at a time. The rest period between pre-shape and final shape is when I cleaned my workspace and prepped my bannetons. It’s dead time — use it.
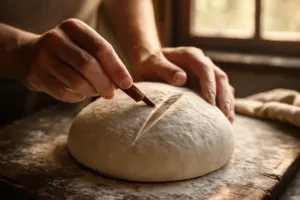
Final Shaping a Boule (Round Loaf)
The boule is the shape most beginners should start with. It’s more forgiving than a batard because tension comes from all directions equally.
- Lightly flour the top of your rested pre-shape. Flip it over so the floured side is down and the sticky side faces up.
- Grab the edge of the dough closest to you and fold it up to the center. Press gently to seal.
- Grab the left side and fold it to the center. Then the right. Then the far edge. You’ve now created an envelope.
- Flip the whole thing over so the seam side is down on an unfloured part of your surface.
- Using both hands cupped around the dough, pull it toward you. The friction between the dough and the unfloured surface creates tension on the top skin. Rotate slightly and pull again. Repeat 3 or 4 times until the surface is taut and smooth.
- You should feel the dough resisting — that’s the tension you want. If the surface tears, you’ve gone too far. If it still looks loose and saggy, keep going.
Place the shaped boule seam-side up into a floured banneton. The seam side goes up because the loaf will be flipped out onto a peel or parchment before baking, putting the seam on the bottom.
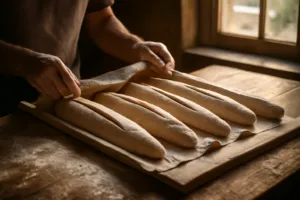
Final Shaping a Batard (Oval Loaf)
The batard is what I bake most often now, and it took me significantly longer to learn than the boule. The challenge is creating even tension across an elongated shape without the dough tapering at the ends or bulging in the middle.
- Flour the top of your rested pre-shape and flip it smooth side down.
- Gently stretch the dough into a rough rectangle, about 8 by 10 inches. Don’t degas it aggressively — you want to preserve the bubbles from fermentation.
- Fold the top third down to the center. Press the seam gently with your fingertips.
- Fold the bottom third up and over the first fold. Press again.
- Now roll the dough toward you, using the heel of your hand to seal the seam as you go. You should end up with a log shape, seam side down.
- With both hands placed on the center of the log, gently roll outward toward the ends to even out the shape. Apply slightly more pressure at the ends to create the tapered batard silhouette.
- Place seam-side up in an oval banneton.
The single biggest mistake I see with batard shaping is not sealing the seam. If the seam opens during proofing, the loaf splits from the bottom during baking. I press firmly with the heel of my hand along the entire seam after rolling — it should be completely closed.
The Surface Tension Test
After you’ve finished shaping — either boule or batard — poke the dough gently with a floured finger. The surface should feel taut, like a filled balloon. If your finger pushes in easily and the dough collapses slightly, the tension is insufficient. Give it another round of cupping and pulling (for boules) or tighten the roll (for batards).
During my production years, I developed a quick visual check: a properly shaped loaf holds its height for at least 5 minutes on the bench before starting to spread. If it immediately starts to pancake, either the shaping was loose or the dough is overfermented. At that point, reshaping might save it if fermentation is fine — let it rest another 10 minutes and try once more.
Common Shaping Mistakes I Made (So You Don’t Have To)
Too Much Flour
I used to flour my bench heavily because I was afraid of sticking. The problem is that flour eliminates the friction you need to create surface tension. The bench should be lightly floured for pre-shaping and flipping, but the final tensioning step — where you drag the dough toward you — needs to happen on a clean, unfloured surface. The drag creates the tension.
Degassing During Shaping
Your instinct will be to press hard. Fight it. Every time you push down on the dough, you’re collapsing the gas structure you spent hours building during fermentation. Handle the dough with confident but gentle hands. Fold and roll — don’t press and flatten.
Shaping Cold Dough
If you shape dough straight from the fridge, it fights you. The gluten is stiff and uncooperative. Always shape at room temperature. If you’re doing a cold bulk, let the dough warm on the bench for 15 to 20 minutes before pre-shaping.
Skipping the Bench Rest
I cannot overstate how important the rest between pre-shape and final shape is. When I’m in a hurry, it’s the step I’m tempted to skip, and the results are always worse. The gluten needs to relax. Give it time.
What I Use for Shaping
Good tools make shaping significantly easier, especially when you’re learning.
A bench scraper is non-negotiable. I use a Ateco Stainless Steel Bench Scraper — simple, sturdy, and the right size for cupping and dragging. It’s what I’ve used for years and I see no reason to change.
For banneton baskets, I use both round and oval depending on the shape. This 10-Inch Round Banneton Proofing Basket with Linen Liner is what I recommend for boules — the 10-inch size fits a standard 900g to 1000g loaf perfectly. For batards, I use an Oval Banneton Proofing Basket for Sourdough — the right proportions matter for keeping the batard shape during proof.
If you want a complete shaping and scoring kit, the Sourdough Bread Baking Kit with Banneton Basket, Lame, and Bench Scraper Set is a solid all-in-one option that covers everything you need.
This post contains affiliate links. As an Amazon Associate I earn from qualifying purchases.
Practice Is the Only Shortcut
I wish I could tell you there’s a trick that makes shaping click instantly. There isn’t. It took me about 30 loaves before my shaping became consistently reliable, and another 50 before I stopped thinking about it and could just do it by feel.
What accelerated my learning was baking in batches. When I shaped 12 loaves in a row at the microbakery, I improved faster in a single session than I had in months of baking one loaf at a time. If you can, double or triple your recipe and shape multiple loaves — the repetition builds muscle memory quickly.
Shaping is a physical skill. Your hands need to learn what proper tension feels like, and that only comes from doing it. Start with boules, move to batards when you’re confident, and don’t be discouraged by flat loaves along the way. They still taste good.
The Bench Scraper That Finally Gave Me Control Over My Dough
A bad bench scraper — or worse, no bench scraper — means you’re fighting your dough during the most critical moment: when you’re building tension and creating that tight skin. I spent two years using whatever was in my kitchen drawer, and it showed in every loose, shapeless boule I pulled from the oven.
What works
- The stainless steel edge is sharp enough to cleanly cut and scrape dough without dragging, which matters when you’re trying to build tension without tearing the surface skin.
- The flat, rigid blade holds a true edge and doesn’t flex or bend when you’re pressing down during the final pre-shaping, giving you actual control instead of just mashing.
- It’s heavy enough that you don’t need to force it — the weight does the work — and it won’t get dinged up after a few hundred uses like cheaper ones do.
What doesn’t
- The handle is metal and can get slippery with wet dough — I’ve learned to keep a towel nearby, especially in high-humidity fermentation rooms.
- It’s sharper than most home bakers expect, which is honestly a feature, but you need to respect it or you’ll nick your hands during a quick shaping session.
I nearly sent this one back after my first microbakery shift because I thought the blade was too aggressive, but that “aggression” is exactly what lets you shape with precision instead of luck. Ateco Stainless Steel Bench Scraper
Ateco Stainless Steel Bench Scraper
I use this for every shape—the weight and edge control actually let me build tension instead of fighting the tool.
Check Price on Amazon →This post contains affiliate links. As an Amazon Associate, I earn from qualifying purchases at no extra cost to you.