I can still picture the crumb shot from my very first tray of sourdough English muffins — golden and even on the outside, but when I tore one open, it was tight, pale, and almost bready inside, with nothing resembling a hole for butter to soak into. What that flat, close crumb told me was that the texture everyone raves about actually comes from running a much wetter dough than most recipes let on, and from splitting the muffins open with a fork rather than cutting them with a knife. The moment I quit fighting the tackiness of the dough and let it stay loose and sticky, the crumb finally blew open the way it’s meant to. Eleven years into home baking now, plus a few of those years running weekend batches out of my kitchen for neighbors through a small home microbakery, I’ve come to think of sourdough English muffins as less of a precision exercise and more of a listening exercise — you just have to pay attention to what the dough is showing you.
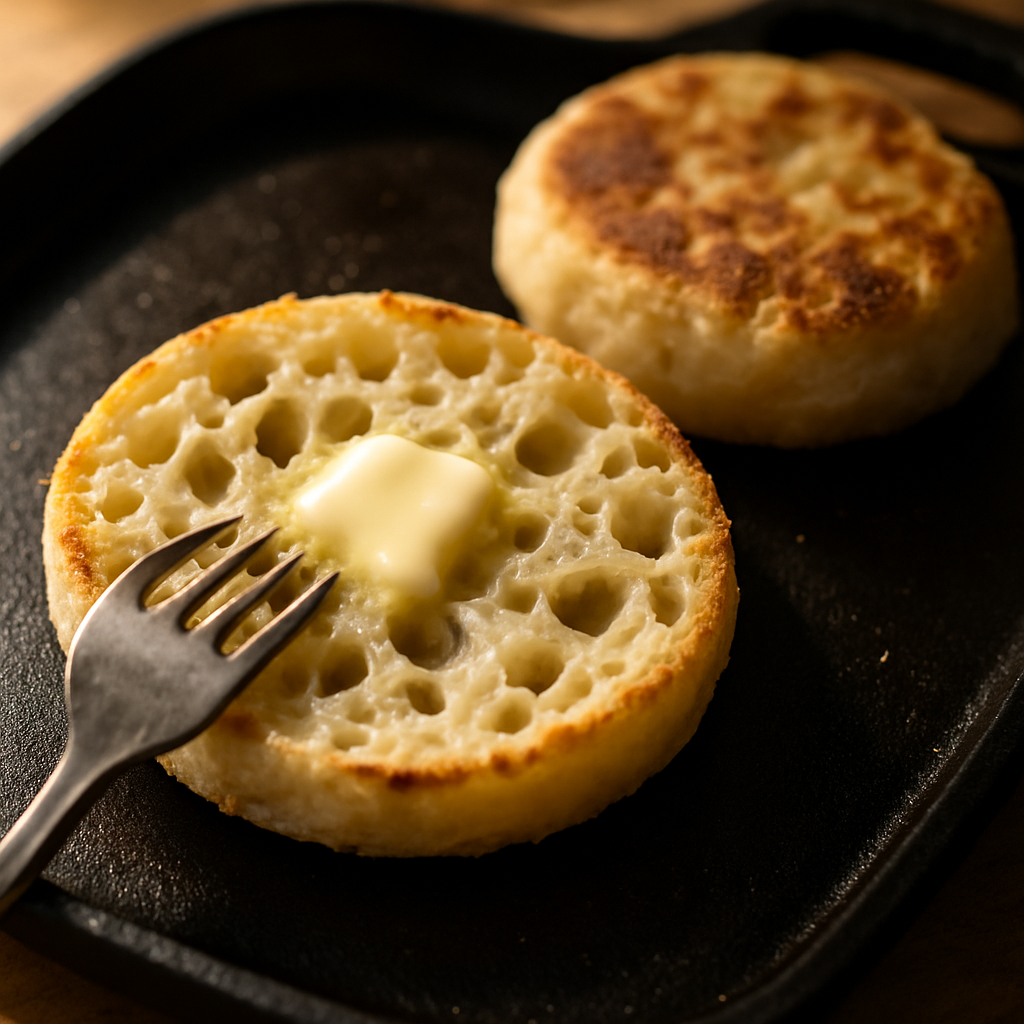
There’s a small thrill in pulling apart a warm, toasted muffin and finding those deep, uneven caverns inside — exactly the kind that trap butter and jam and turn an ordinary breakfast into something worth savoring. Getting to that point, though, means figuring out where most recipes go wrong. What separates a heavy, letdown of a muffin from one with real open structure boils down to three variables: how much water is in the dough, how the fermentation is handled, and what happens once it hits the griddle.
The Water Content Most Recipes Won’t Admit To
In my early attempts at sourdough English muffins, I mixed the dough at roughly the same hydration I’d use for a sandwich loaf — somewhere around 75 percent. What came off the griddle was uniform, tight-crumbed, dense, and chewy in the wrong way. I spent ages adjusting the griddle temp, the fermentation window, even how I scored them — messing with every variable except the one that actually mattered.
The real fix is pushing the water way up. We’re talking 85 to 88 percent hydration territory. At that level, the dough behaves almost like a thick batter while you mix — it spreads, it slumps, it makes you wonder if you’ve made a mistake somewhere. You haven’t. All that extra water turns into steam once the muffins hit heat, and that steam is what puffs them and carves out those signature holes. As long as the gluten network is built through patient fermentation rather than hard kneading, it can hold onto that water without falling apart.
The pan you cook on matters more than most people admit when it comes to sourdough English muffins — you need steady, even heat across the whole surface or you end up with flat spots and uneven browning. I’ve had good luck with the Lodge Reversible Cast Iron Grill/Griddle Pan 16.75 x 9.5 – Pre-Seasoned Dual-Sided Double Burner for BBQ, Eggs, Pancakes, Burgers – PFAS Free Cookware – Flat Top Plate for Oven, Grill, & Campfire, which spans two burners and holds heat consistently enough that I can cook a full batch without the muffins on the edges cooking at a different rate than the ones in the middle. It’s pre-seasoned, PFAS-free, and honestly one of the more useful pieces of cast iron I own.
Here’s the ratio I actually rely on, sized for a batch of eight muffins:
- 400g bread flour
- 350ml water (87.5% hydration)
- 80g active, bubbly sourdough starter (fed 4–6 hours prior)
- 8g salt
- Cornmeal or semolina for dusting
Start by combining just the flour and water, then leave it alone for 30 minutes to an hour — that autolyse rest builds extensibility while keeping the dough workable. After that, mix in your starter and salt until everything’s fully combined. What you’ll have is shaggy and clingy. That’s exactly right.
Letting Slow Fermentation Do the Heavy Lifting
With hydration this high and a fairly modest amount of starter driving things, there’s no shortcutting the fermentation stage. Over the first two hours, I run a set of stretch-and-folds every 30 minutes. Each round takes about two minutes — grab one side of the dough, stretch it upward, fold it back over itself, turn the bowl, and repeat. This builds the strength the dough needs without ever pulling it out onto the counter.
Once those early folds are done, the dough bulk ferments at room temperature — about 72°F in my kitchen — for a total of 4 to 5 hours. You want to see it grow by roughly half its starting volume, with clear bubbling visible along the surface and sides through the glass bowl. Give the bowl a gentle shake and it should jiggle — that wobble is your signal that gas is developing properly.
This slower, cooler stretch of fermentation earns you two things: it gives the sourdough its real tang (these should taste noticeably sour, not like a generic English muffin), and it lets the dough build enough gluten strength on its own to hold steam during cooking, no rough mixing required.
Shaping Plus the Griddle Move That Makes All the Difference
Once bulk fermentation wraps up, tip the dough out onto a heavily floured counter. No need to baby it here — this dough can take some handling. Cut it into eight pieces of roughly equal size (about 105g apiece). Shape each into a round with a light touch: bring the edges in toward the middle a few times, turn it seam-side down, then use cupped hands to drag it across the floured surface toward you. That drag is what builds surface tension without overhandling the dough.
If the Lodge is out of stock or you want to compare options before committing, the EWFEN Reversible Grill/Griddle, 16.7×9.5” Pre-Seasoned Cast Iron Griddle Pan, Double Burner Cookware, Rectangular Stovetop Griddle with Handles, Flat Top Plate for Oven, Grill & Campfire is worth a look — it’s nearly identical in footprint, which means you get the same two-burner coverage that makes cooking a full batch of muffins practical. The handles make it easier to move around, which I appreciate when I’m transferring it off the stove.
Coat each round heavily in cornmeal or semolina, covering every side. This does double duty — it keeps things from sticking during the second rise and once they hit the griddle, and it gives the finished muffin that classic gritty exterior. Let them sit at room temperature to proof for 1 to 2 hours. They should look clearly puffed up but still spring back and hold shape when you press them gently.
This next part trips up almost everyone the first time around: the griddle stage. Bring your griddle or cast iron pan up to medium heat — roughly 350°F if you’ve got an instant-read thermometer to check. Medium is the key word here, not high. Crank the heat and you’ll set the exterior before the interior gets a chance to puff and develop those holes. I give mine 6 to 7 minutes per side. You’re aiming for pale golden bottoms with a few darker freckles here and there — not a deep, aggressive brown.
You’ll notice the muffins spreading a bit as they cook — that’s just the dough loosening up while the steam gets to work. Leave them be. Don’t press down or fuss with them; just let the process play out.
Why a Fork, Never a Knife
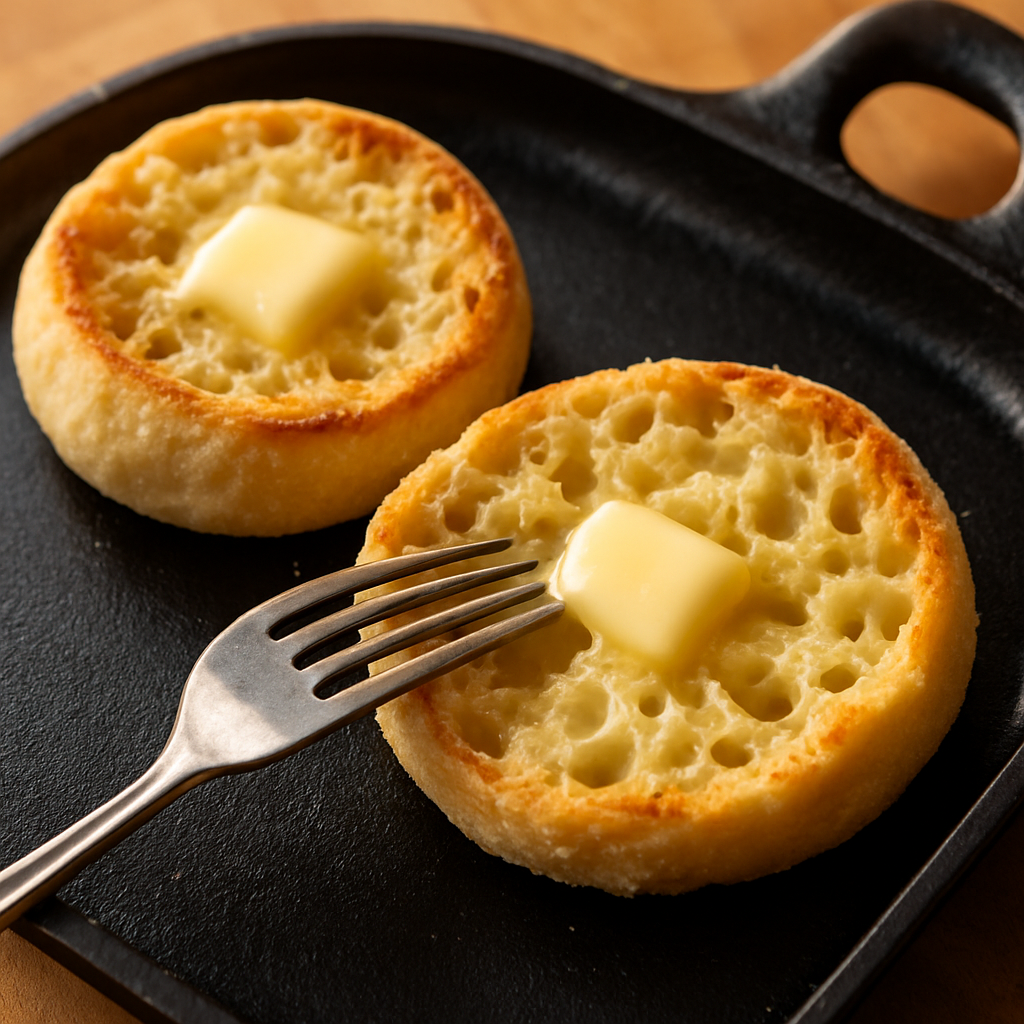
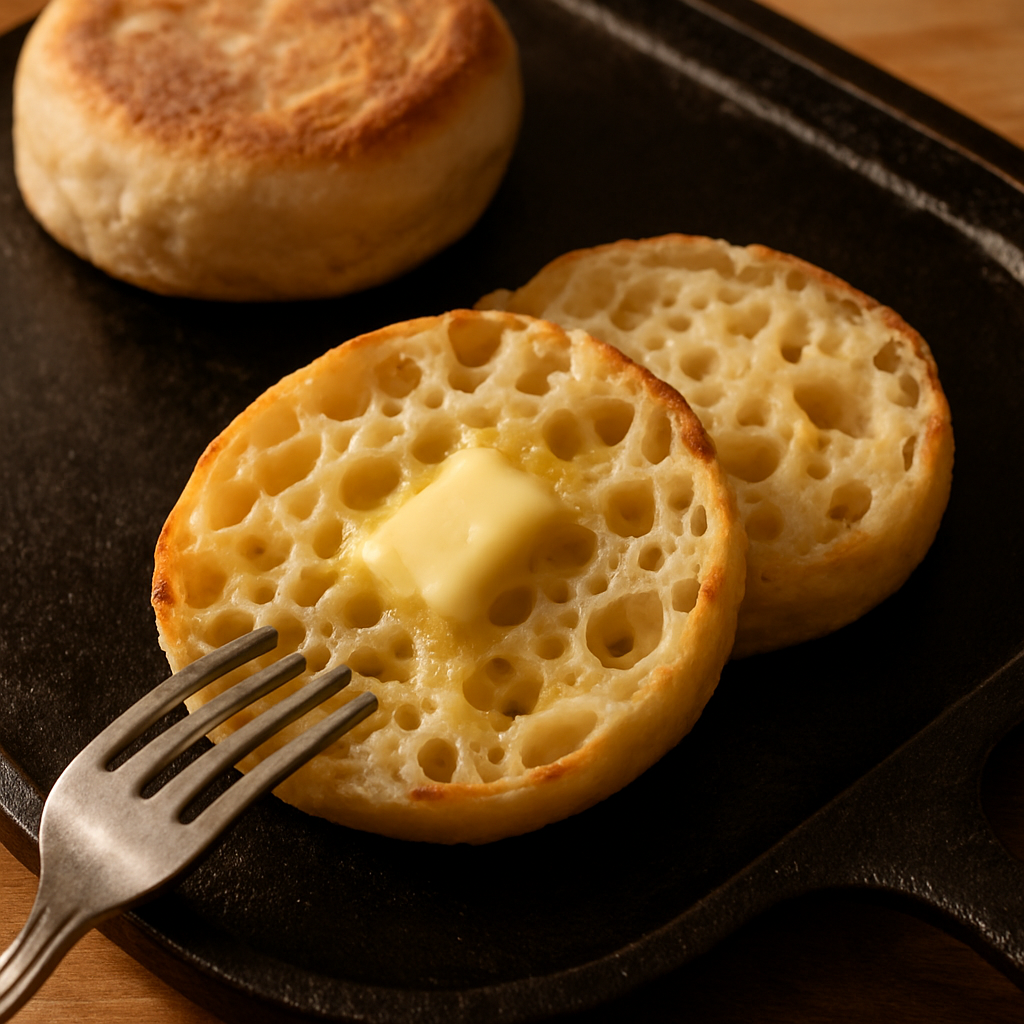
This is the step where everything comes together, and it’s also where I fumbled the most when I started out. Once the muffins have cooled down a little, take a fork — not a bread knife — and work the tines gently around the outer edge, prying the two halves apart. You’re not really cutting anything; you’re peeling it open along its natural seams. The tines follow the weak spots baked into the crumb, those internal layers formed by steam and fermentation. Get it right, and the muffin practically springs open on its own, showing off a rough, hole-riddled interior.
Reach for a knife instead, and you squash the crumb, killing that texture entirely. I’ve run this comparison more times than I can count at this point — maybe fifty — and the gap between the two methods is obvious every time. A fork-split muffin holds onto butter in all those pockets and keeps the contrast between the crisp outside and soft inside intact. Slice it, and all of that gets flattened out.
The first time I pried one open and saw those deep, irregular holes staring back at me, I finally understood why this bread’s been around for centuries. It’s not only the flavor — though that sourdough sourness genuinely makes them better — it’s the mouthfeel. That messy, uneven crumb is really the whole point of the exercise.
Working through sourdough English muffins nudged me away from treating recipes like fixed instructions and toward seeing dough as something alive that just needs the right setup to do what it naturally wants to do. The higher hydration, the unhurried fermentation, the careful griddle handling, and that gentle fork split all come together to produce something that looks simple on the surface but really depends on understanding your ingredients and your process.
Step by Step
- Autolyse. Combine the flour and water, then let it rest for 30 minutes to an hour.
- Mix. Work in the starter and salt until fully combined. The dough should be shaggy and sticky — that’s the correct texture.
- Strengthen. Run a set of stretch-and-folds across the first two hours, spacing them 30 minutes apart.
- Bulk ferment. Let the dough sit at room temperature (about 72F) for 4 to 5 hours total, until it’s grown roughly 50 percent in volume, shows clear bubbling, and jiggles when the bowl is moved.
- Divide and shape. Tip the dough onto a well-floured surface and cut into eight roughly equal pieces (around 105g each). Shape each into a round by folding the edges toward the center a few times, flipping it seam-side down, then dragging it toward you across the floured surface with cupped hands.
- Dust and proof. Coat each round generously with cornmeal or semolina on all sides, then let them proof at room temperature for 1 to 2 hours, until visibly puffed but still holding shape under a gentle poke.
- Cook on the griddle. Bring your griddle or cast iron skillet to medium heat, roughly 350F. Cook each muffin 6 to 7 minutes per side, until the bottoms turn pale golden with a few slightly darker spots.
- Fork split, skip the knife. Once slightly cooled, work a fork’s tines around the edge of each muffin to separate the halves and expose the open, irregular crumb inside.
If English muffins have felt out of reach, or your past attempts looked fine but ate dense, give this method a shot. Use the hydration numbers above, trust the fermentation schedule, and commit to splitting them with a fork instead of a knife. Let me know how your first batch turns out — leave a comment below and tell me what kind of crumb you end up with.
Frequently Asked Questions
What hydration percentage should sourdough English muffins be?
Sam uses 85 to 88 percent hydration for sourdough English muffins, which is significantly higher than the roughly 75 percent used for sandwich loaves. The extra water turns to steam during cooking, creating those signature holes and open crumb structure that tight, lower-hydration doughs never achieve.
Why should you split English muffins with a fork not a knife?
A fork splits muffins along their natural seams created by steam and fermentation, preserving the rough, hole-riddled interior texture. A knife squashes the crumb and kills that texture entirely. Sam has compared these methods roughly fifty times and the difference in how butter holds in the pockets is obvious every time.
How long should English muffin dough bulk ferment?
Bulk fermentation takes 4 to 5 hours total at room temperature, roughly 72°F. The dough should grow by roughly half its starting volume, show clear bubbling along the surface and sides, and jiggle when the bowl is gently shaken, signaling proper gas development.
What griddle temperature and time for sourdough English muffins?
Cook on medium heat at roughly 350°F for 6 to 7 minutes per side. Medium is crucial—high heat sets the exterior before the interior can puff. You want pale golden bottoms with a few darker freckles, not deep brown, and should let the muffins spread as they cook without pressing or fussing.
About This Article

Written by Sam Whitaker. Sam Whitaker has been baking sourdough for over a decade, including three years baking commercially, and now works out of a home kitchen in the Pacific Northwest. Sam's eleven-year-old starter, Harold, is the foundation for every recipe and troubleshooting guide on Sourdough Rising — real bread tested over and over until it works. More about this site.
Scope and limits. Sam is a home baker with no formal culinary training. Follow current food safety guidance for storage and handling, particularly with enriched or filled doughs.
Verify this against a primary source
Specifics change, and your situation may differ from the one described here. These are the authorities worth checking directly:
- USDA FoodData Central — flour and ingredient composition data
- FoodSafety.gov — safe handling and storage