It was 7:14 on a Saturday morning when I stood in my kitchen in mismatched socks, staring at a very sad, very flat loaf of sourdough and wondering how I had managed to ruin bread that was supposed to be done by dinner. My mother-in-law was arriving at 6 PM. I had promised her a homemade sourdough boule. And my starter — my beloved, usually reliable starter — had apparently decided to take the weekend off. That was the day I became obsessed with cracking the code of same day sourdough 8 hours, and honestly? It changed my entire baking life.
This post contains affiliate links. As an Amazon Associate, I earn from qualifying purchases.
If you’ve ever felt like sourdough is this mysterious, temperamental creature that operates on its own schedule with zero regard for yours, you are my people. Most sourdough recipes ask you to plan 24 to 48 hours in advance, which is great in theory and almost never how my life works. I needed a faster path, and after a lot of trial, error, and one truly mortifying moment I will tell you about shortly, I found one that genuinely delivers a gorgeous, tangy, open-crumb loaf in a single day.
Why Same Day Sourdough in 8 Hours Actually Works
Here is the thing about sourdough: time and temperature are doing the same job. A slow, cold ferment over 18 hours and a warm, controlled ferment over 6 to 8 hours can produce remarkably similar results, as long as you understand what you are actually trying to accomplish. The goal is fermentation, not just waiting. When you give your dough a warmer, more controlled environment, the wild yeast and bacteria in your starter get to work faster, building flavor, structure, and those beautiful air pockets we are all chasing.
The secret weapon in a same day bake is a proofing box. I cannot stress this enough. Before I started using one, I was sticking my dough in the oven with the light on and praying. Sometimes it worked. Often it did not. A dedicated proofing box gives you consistent, precise warmth the entire time, which means your fermentation timeline becomes predictable instead of a complete mystery.
What You Will Need: My Gear Recommendations
You do not need fancy equipment to bake sourdough, but a few tools make same day baking dramatically more reliable. Here is what I actually use and love.
For temperature-controlled proofing, I rotate between a couple of options depending on the batch size. The GIYUDOT Folding Bread Proofing Box is my go-to for weekend baking. It has a 50 to 113 degree Fahrenheit temperature range, a 48-hour timer, and a built-in humidor, which keeps your dough from developing that sad dried-out skin during bulk fermentation. I set it to 78 to 80 degrees Fahrenheit and it holds steady the entire time. No more guessing.
When I am baking two loaves at once or doing a bigger batch, I reach for the Bread Proofing Box with Temp and Timer Control. It has an NTC sensor for more precise readings and comes with a bonus shelf, which lets me stack dough containers. The foldable design is also a lifesaver in a small kitchen. And if you are just starting out and want something more budget-friendly without sacrificing reliability, the Versatile Dough Proofer Warming Box is a solid pick with adjustable temperature and a collapsible design that tucks away neatly.
The other tool I consider non-negotiable is a good instant read thermometer. Your dough temperature matters more than most tutorials admit, and checking that your water is the right temperature before mixing is one of the fastest ways to improve consistency. I love the Lonicera Digital Cooking Thermometer for its long stem and backlit display, which is essential when you are peering into a proofing box in a dim kitchen at 6 AM. For speed, the 0.3S Professional Instant Read Meat Thermometer is shockingly fast and accurate, and it doubles beautifully for checking your finished loaf internally at the end of the bake.
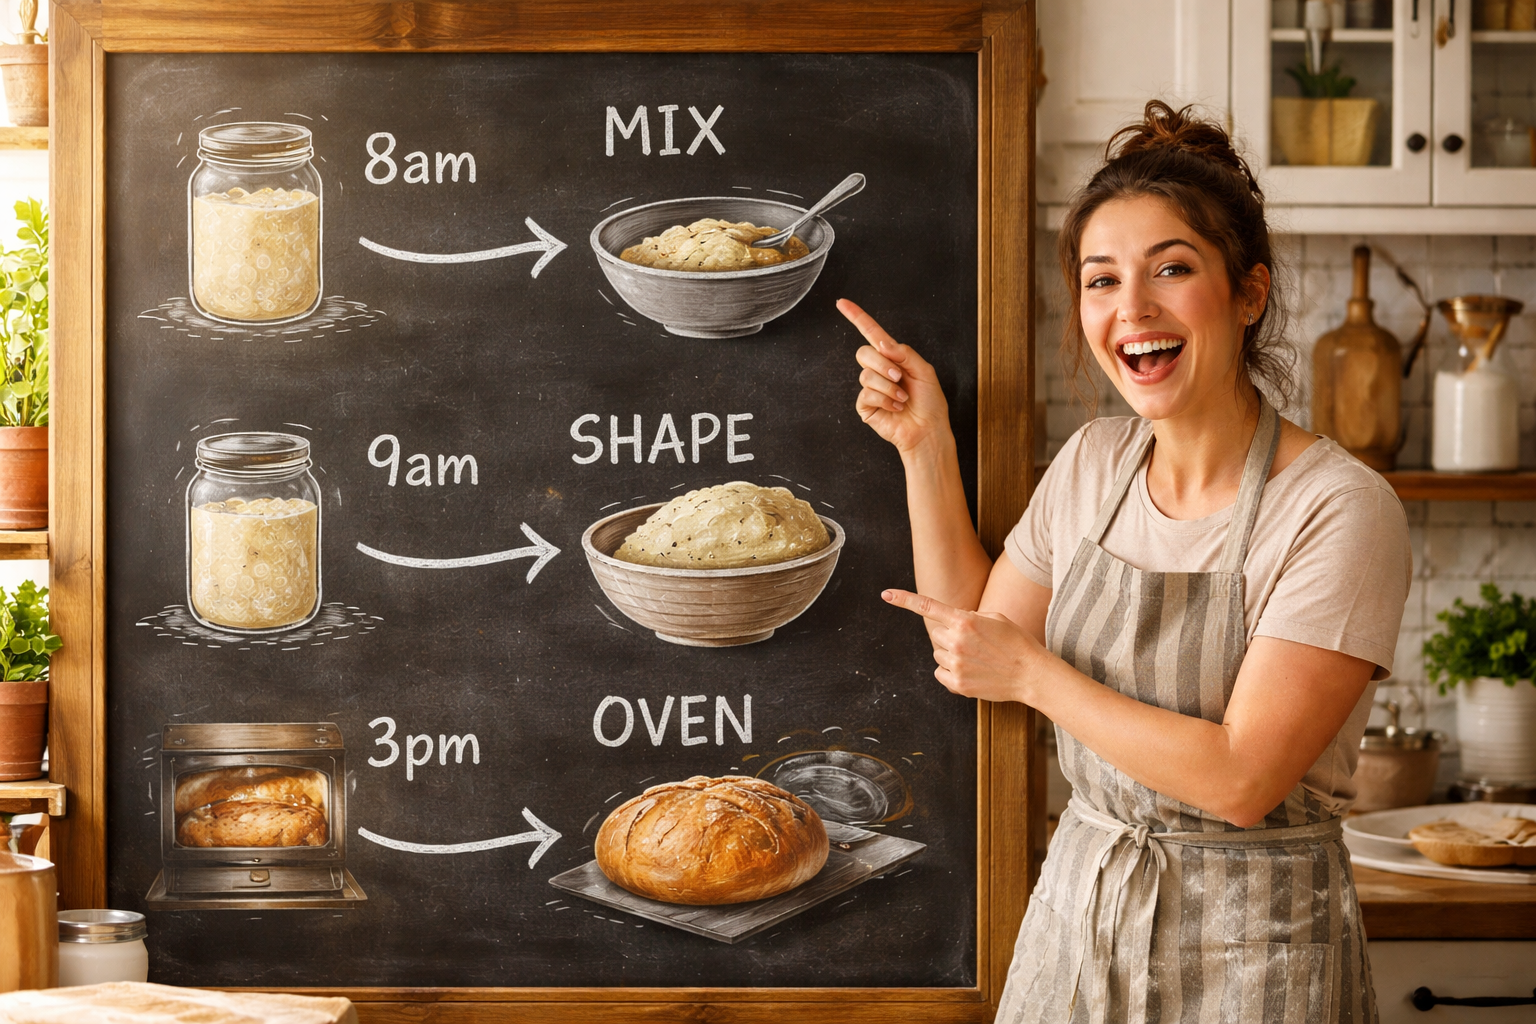
The 8-Hour Same Day Sourdough Timeline
This schedule assumes you are starting with an active, bubbly starter that has been fed 4 to 6 hours before you begin. If your starter is sluggish, warm it up near your proofing box for an hour first. I learned this the hard way — but we will get to that.
Hour 0: Mix Your Dough (7:00 AM)
Combine 450 grams of bread flour, 325 grams of lukewarm water (aim for 90 to 95 degrees Fahrenheit), 9 grams of salt, and 90 to 100 grams of active starter. Mix until no dry flour remains, then let it rest for 30 minutes. This is your autolyse, and it builds gluten passively while you drink your coffee.
Hours 1 through 4: Bulk Fermentation with Stretch and Folds (8:00 to 11:00 AM)
Place your dough in your proofing box set to 78 to 80 degrees Fahrenheit. Perform four sets of stretch and folds during the first two hours, spaced about 30 minutes apart. After that, let the dough ferment undisturbed. You are looking for 50 to 75 percent volume increase, a slightly domed top, and bubbles visible along the sides of your container. At a consistent 78 to 80 degrees, this usually lands right around hour 4.
Hour 4: Shape and Cold Proof (11:00 AM)
Turn the dough out, do a gentle pre-shape, rest for 20 minutes, then do your final shape. Place it seam-side up in a well-floured banneton, cover, and transfer to the refrigerator. A cold proof of 1 to 2 hours firms the dough up and makes scoring infinitely easier. This also adds a lovely hint of tang you would not otherwise get in a shorter ferment.
Hour 6: Preheat and Prep (1:00 PM)
Crank your oven to 500 degrees Fahrenheit with your Dutch oven inside. Preheat for a full 45 to 60 minutes. Do not rush this step. A screaming hot Dutch oven is what gives you that dramatic oven spring and crackly crust.
Hour 7 through 8: Bake (2:00 to 3:00 PM)
Score your cold dough, bake covered at 500 degrees Fahrenheit for 20 minutes, then remove the lid and drop to 450 degrees Fahrenheit for another 20 to 25 minutes until deeply golden. Internal temperature should hit 205 to 210 degrees Fahrenheit. Then comes the hardest part: let it cool for at least one hour before slicing.
The Day Everything Went Wonderfully Wrong
Back to that Saturday morning. What I eventually figured out — after squinting at my starter for a full ten minutes and Googling “why is my starter sad” — was that I had stored it right next to a cold draft from the window. My starter was not dead, it was just absolutely freezing and refusing to cooperate, like a teenager being asked to clean their room before noon.
I placed my starter jar inside my proofing box set to 76 degrees Fahrenheit for 90 minutes. Then I fed it and waited another hour. By 9:30 AM it was doubled and beautifully bubbly. I started my dough late. I panicked a little. I did the bulk fermentation at a slightly warmer 82 degrees Fahrenheit to make up time, skipped a longer cold proof in favor of a quick 45-minute chill, and threw that loaf into the Dutch oven at 4:45 PM.
My mother-in-law arrived at 6 PM to a kitchen that smelled absolutely incredible. The loaf had the best ear I had ever scored in my life. She took three photos of it before we cut it. She now tells people I am a “professional bread person,” which I am not, but I am absolutely not correcting her.
Quick Tips to Make Your 8-Hour Bake a Success
- Use warm water (around 90 degrees Fahrenheit) to give your dough a head start on fermentation from the very first mix.
- If your kitchen is cold, do not try to compensate by using hotter water. Use your proofing box instead for steady, even warmth.