I opened the fridge to grab some leftover pasta, and there it was — a mason jar shoved all the way to the back, behind the mustard and a suspicious block of cheese, wearing a gray-brown liquid hat like some kind of sourdough Ghost of Christmas Past. I had completely forgotten about my starter. For four months. I won’t tell you what my first thought was, but my second thought was: is this thing even saveable? If you’ve ever found yourself staring down a forgotten jar and wondering whether reviving a neglected sourdough starter is even worth attempting, I want you to know — it absolutely is, and I’m living proof.
This post contains affiliate links. As an Amazon Associate, I earn from qualifying purchases.
I’d like to say I refrigerated my starter with great intention, the way serious bakers do — carefully labeled, mentally noted, with a responsible feeding schedule in mind. I did not. I put it in the fridge in late October because I was stressed about the holidays and “just needed a break from baking.” And then life happened, as it tends to do. By the time February rolled around, I had genuinely forgotten the starter existed. My husband found it while reorganizing the fridge and brought it to me the way a cat brings you a dead bird: with equal parts pride and mild disgust. “Is this… alive?” he asked. Reader, I had no idea.
What’s Actually Happening When Your Starter Goes Dormant
Here’s the thing that made me feel a whole lot better once I started researching: a starter that’s been left in the fridge for months isn’t dead, it’s just deeply, dramatically asleep. The cold temperature of a refrigerator slows yeast and bacterial activity to a near standstill, which is exactly why cold storage works as a preservation method in the first place. The liquid layer sitting on top — that gray or brownish liquid that looks absolutely horrifying — is called “hooch,” and it’s actually just alcohol produced by the hungry, dormant yeast as a byproduct of fermentation. It smells like nail polish remover and sadness, but it’s not a sign of death. It’s a sign of hunger.
The wild yeast and lactic acid bacteria that make your starter work are incredibly resilient. They can survive weeks, months, and in some cases even longer periods of neglect in cold storage. What they need to wake back up is warmth, fresh flour, fresh water, and a little patience from you. That’s it. No miracles required.
What You’ll Need for Reviving a Neglected Sourdough Starter
Before we get into the step-by-step rescue process, let me tell you what I actually used. Having the right tools makes the whole thing feel less like emergency surgery and more like a fun kitchen project.
- A clean jar: I use Ball Wide Mouth Glass Mason Jars, Pint Size 16 oz (Pack of 3) for the early stages of revival when I’m working with smaller quantities, and I graduate to the Ball Wide Mouth Mason Jars, Quart Size 32 oz (Pack of 2) once the starter gets active and bubbly and starts to need more room to grow. Wide mouth jars are so much easier to stir in than narrow ones. I learned that the embarrassing way.
- Rye flour: This is my secret weapon for waking up a sluggish starter. Rye flour is packed with wild yeast food and minerals that give dormant cultures a serious jumpstart. I love King Arthur Organic Medium Rye Flour, 3 lbs — it’s consistently fresh and has a gorgeous robust flavor. If you prefer a smaller bag to start, Bob’s Red Mill Organic Dark Rye Flour, 20 oz is a great option and easy to find.
- All-purpose or bread flour: Once the starter starts showing signs of life, you’ll transition to a blend of rye and white flour to build up strength.
- Filtered or room-temperature water: Chlorinated tap water can inhibit fermentation, so let your tap water sit out for 30 minutes or use filtered.
- A rubber band or piece of tape: Mark the level of your starter in the jar after each feeding so you can actually see if it’s rising. This was genuinely thrilling once things started working.
- Bonus option if you’re starting fresh: If your starter is truly beyond saving — or if you want a backup culture with proven vitality — I’d grab a Freshly Fermented Certified Organic Sourdough Starter, Rye to have on hand. I haven’t needed to use mine yet, but having it as insurance is incredibly reassuring.
The Step-by-Step Starter Revival Process
Okay, let’s talk about what I actually did, and what you should do too.
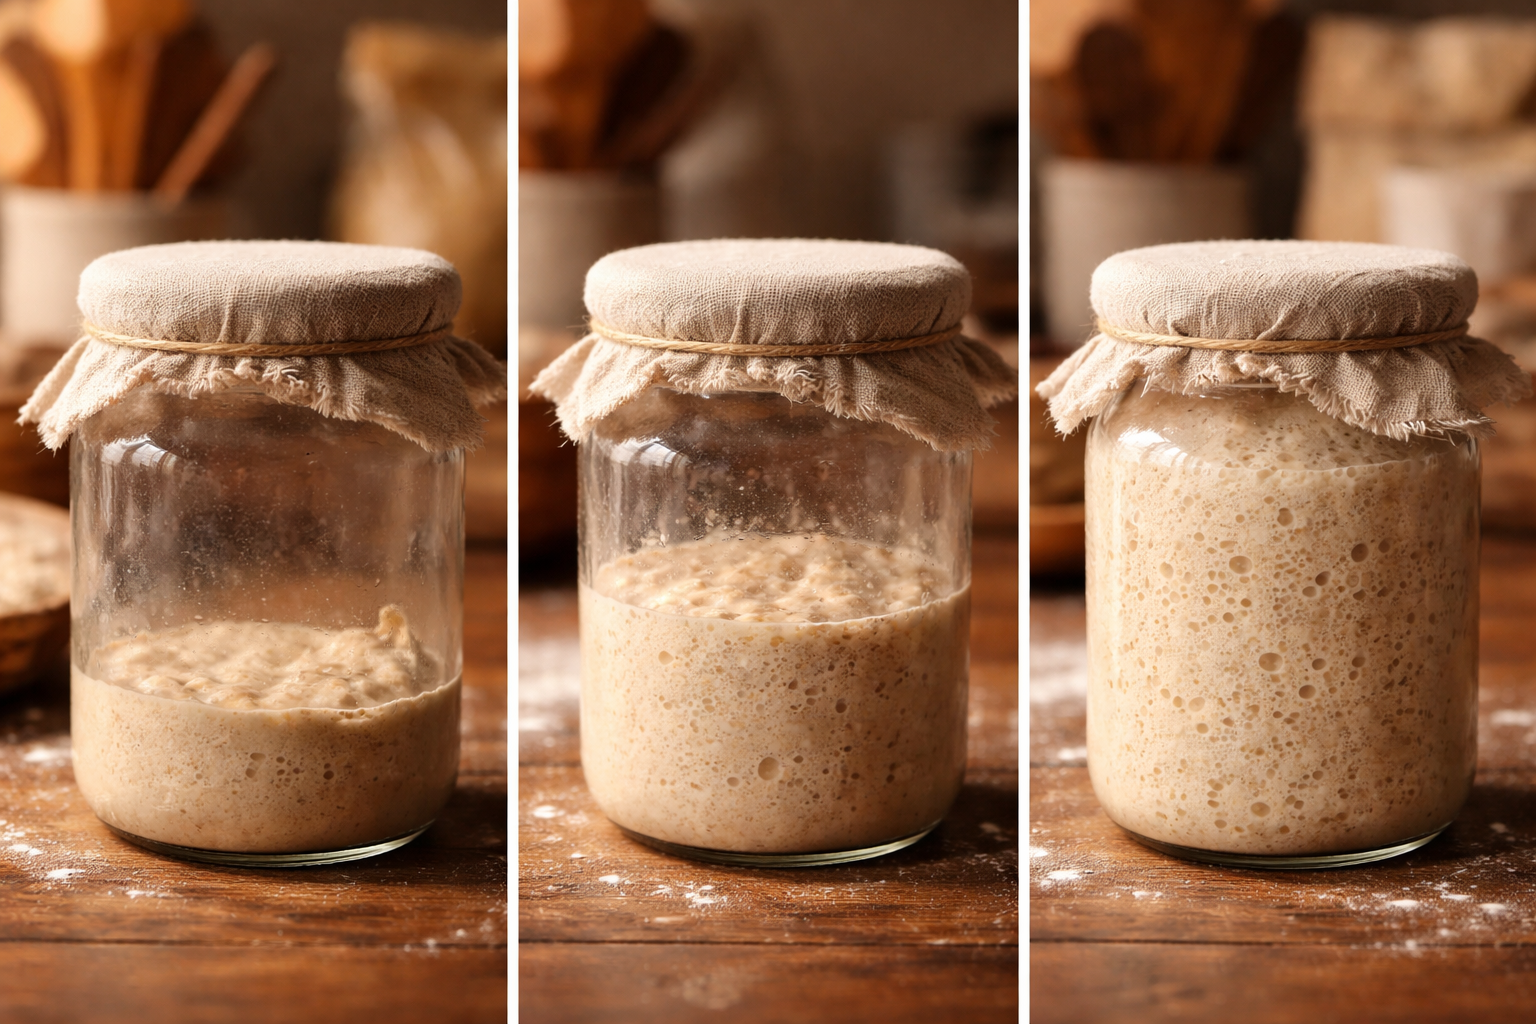
Day 1: The Discard and First Feed
Pour off or spoon out most of the starter, keeping just about 20 to 30 grams — roughly a tablespoon or two. Yes, it will look sad and smell strong. That is completely normal. Scrape it into a clean jar and feed it with 20 grams of rye flour and 20 grams of room-temperature water. Stir vigorously, mark the level, cover loosely with a cloth or loosely placed lid, and leave it at room temperature. Don’t expect fireworks yet. Mine looked completely inert for the first 24 hours. I may have talked to it encouragingly anyway.
Days 2 and 3: Keep Feeding, Stay Patient
Once or twice a day, discard most of the starter again (keeping just 20 to 30 grams) and feed with equal weights of flour and water. I used a blend of rye and all-purpose during this phase — roughly half and half — to start building a more balanced flavor profile. By day two, I noticed tiny bubbles forming along the sides of the jar. I may have texted a photo to three separate friends who don’t even bake. They were not as excited as I was. Their loss.
Days 4 and 5: Looking for Rise
By day four, you’re hoping to see your starter rise noticeably between feedings, ideally doubling in size within 4 to 8 hours of a feeding at room temperature. This is when the rubber band marker earns its keep. If your starter is rising and falling predictably, you’re in business. If it’s still just producing bubbles without much rise, give it another day or two — room temperature, consistent feeding schedule, fresh flour each time.
Days 5 to 7: The Float Test and Bake Test
The classic float test (dropping a small spoonful of starter into water to see if it floats) can give you a rough idea of readiness — a floaty starter has enough gas production to suggest it’s active. But honestly, the best test is a small bake. Make a batch of pancakes or a simple flatbread with your revived starter. If it smells good and tastes tangy and wonderful, your culture is healthy and ready to go back to regular life.
The Embarrassing Twist I Did Not See Coming
So here’s where I have to come clean. On day five, my starter was rising beautifully. I was thrilled. I did a little victory dance in my kitchen. I went to do my evening feeding and reached for what I thought was my starter jar on the counter — and I fed my husband’s sourdough discard crackers recipe instead. An entirely different jar. I didn’t realize it until I came back two hours later to check on my starter and found it exactly where I’d left it, looking at me with the same level of enthusiasm as a very small, slightly confused cloud of bubbles.
The actual starter jar was behind the fruit bowl the whole time, doing wonderfully, having already peaked and started to fall while I fussed over a jar of crackers like a complete fool. I had to laugh. I had neglected this starter for four months, put it through a dramatic revival process, and then almost lost it to a labeling failure in the final stretch. Truly a very me moment.
But here’s the beautiful ending: the starter was fine. More than fine. That weekend, I made the best loaf I’d baked in over a year. A big, crackling, ear-perfect sourdough with a gorgeous open crumb and a tang that made my husband admit, rather quietly, that maybe my “bread obsession” was worthwhile after all. The starter I’d abandoned, neglected, and accidentally ignored one final time had come back stronger than ever.
You Can Do This Too
If there is a forgotten jar in your fridge right now, please go get it. Reviving a neglected sourdough starter is genuinely one