I stood at my kitchen counter at 7am, oven mitts still on, staring at the most pathetic loaf I had ever baked. No ear. Not even a hint of one. Just a smooth, rounded dome that had split down the side like it was laughing at me. If you have ever Googled “sourdough ear won’t open” at an ungodly hour while still in your pajamas, clutching a coffee and quietly questioning your life choices, then welcome. You are in exactly the right place.
That loaf was my fourteenth attempt at getting a proper ear. Fourteen. I had watched every YouTube video, read every forum thread, and even printed out a scoring diagram that I taped to my cabinet like some kind of artisan bread war room. And still, nothing. But here is the twist ending to my sad little story, and I promise we will get there together.
This post contains affiliate links. As an Amazon Associate, I earn from qualifying purchases.
Why Your Sourdough Ear Won’t Open (And Why It’s Not Your Fault)
Let me save you some frustration right now: a flat, earless loaf is almost never the result of one single problem. It is usually a perfect storm of two or three small things happening at the same time. The good news is that each of those things is fixable once you know what to look for. The bad news is that most tutorials skip the diagnosis and jump straight to technique, which is like a doctor handing you medicine without asking what hurts.
So let us actually diagnose this together, starting with the two biggest culprits: scoring and steam.
The Scoring Problem: Your Angle, Your Blade, and Your Confidence
When I finally asked a baker friend to watch me score a loaf over video call, she said something that stung in the most useful way: “You’re hesitating.” And she was right. I was pressing down slowly, dragging the blade, and scoring almost straight down into the dough. Every single one of those things works against you.
Angle Is Everything
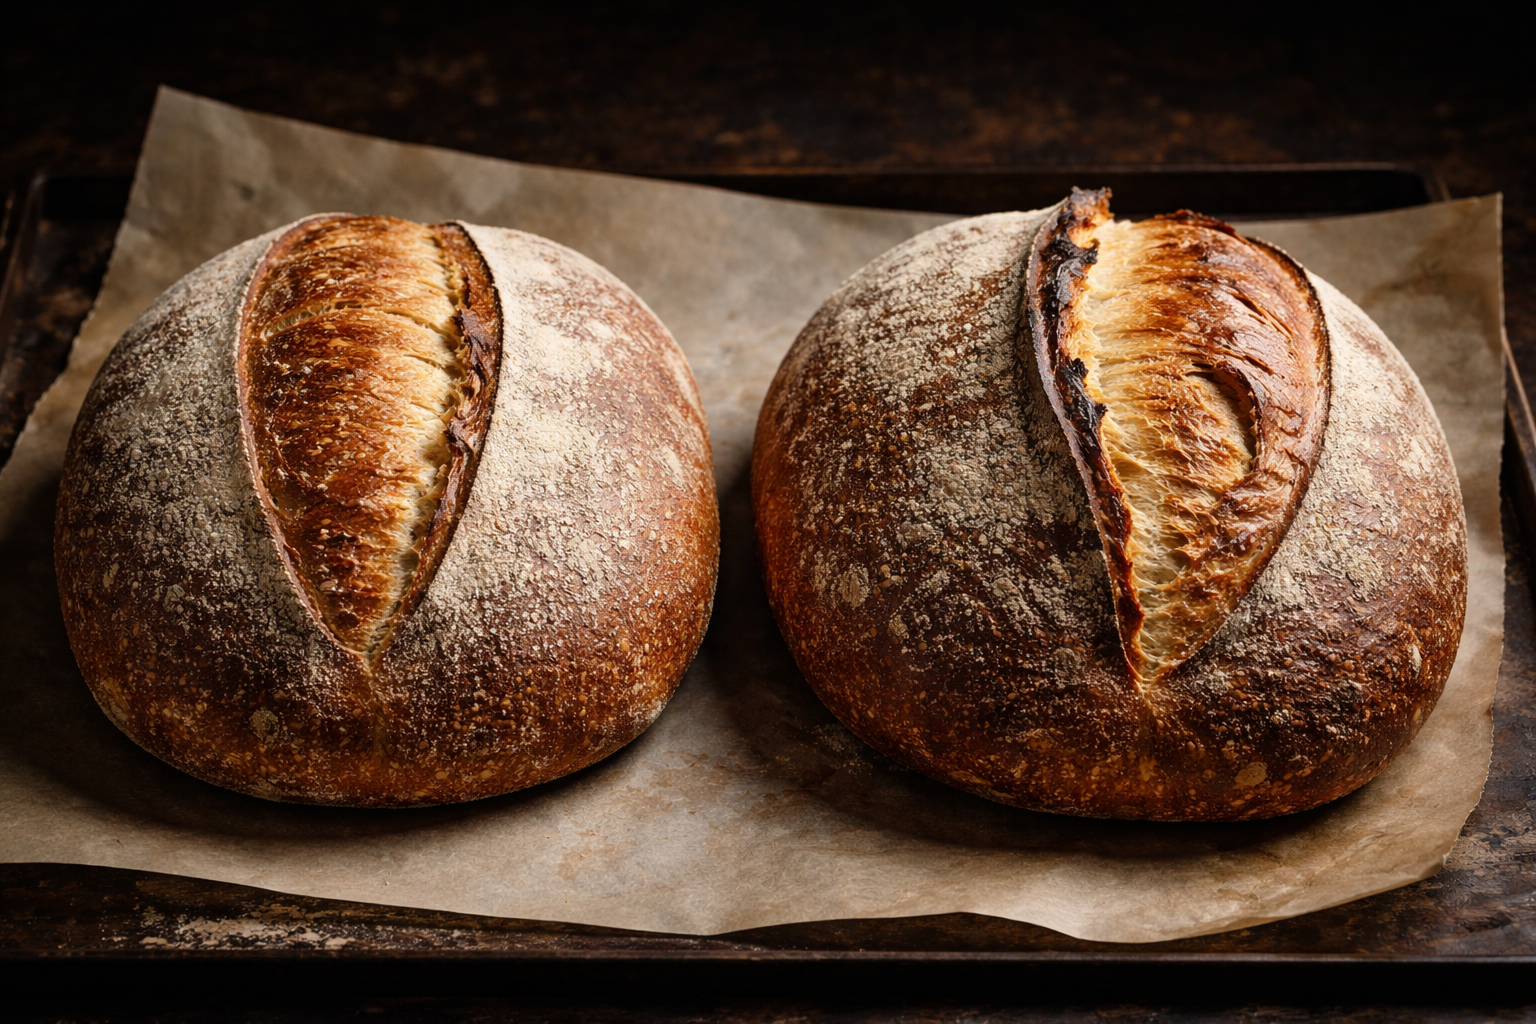
To get that beautiful ear to bloom open, your blade needs to enter the dough at a low, nearly horizontal angle, somewhere between 30 and 45 degrees to the surface. When you score too vertically, the cut pinches closed during baking instead of peeling back and lifting. Think of it less like stabbing and more like slicing a piece of paper at an angle — you want to create a flap, not just a slit.
Speed and Confidence Matter
A slow, hesitant score drags and tears the dough. You want one swift, decisive motion from one end of the loaf to the other. This is genuinely the part that feels most unnatural when you are a careful, nervous baker. But the dough responds to confidence. Take a breath, and commit.
Your Blade Might Actually Be Dull
This was my embarrassing revelation on loaf number fourteen. I had been using the same blade for six bakes. Six. A dull blade drags, tears, and deflates your dough instead of gliding through cleanly. Replace your blade regularly, and make sure you are using a proper bread lame designed for this purpose.
My Gear: The Bread Lames I Actually Use and Recommend
Once I committed to treating my scoring tool as a real piece of baking equipment instead of an afterthought, everything changed. Here are the lames I have tested and love, at a range of price points.
The SAINT GERMAIN Premium Hand Crafted Bread Lame is a classic for a reason. The curved blade gives you that arched, dramatic ear that makes your loaf look like it came from a Parisian boulangerie. It comes with 10 replacement blades and a gorgeous leather protective cover. This one lives on my counter.
If you prefer something sleek and modern, the Extractable and Magnetic Bread Scoring Tool in Beige is a fantastic pick. The retractable design keeps the blade safely tucked away between bakes, and the magnetic locking mechanism feels wonderfully solid in hand.
The X-Sanfuoo Professional Grade Sourdough Scoring Tool is a great budget-friendly option that does not feel budget at all. It comes with a storage cover and extra blades, making it a smart starter lame for newer bakers who want professional results.
For the baker who loves a handcrafted feel, the Drcomtruing Wooden Bread Lame in Reddish Brown is absolutely beautiful. The screw lock keeps the blade secure at your preferred angle, and the warm wooden handle makes scoring feel like a craft rather than a chore.
And if you want to try a few different styles before committing to a favorite, the DRAXZOR 3-Pack Bread Lame Set is an incredible value. Three lames, ten replacement blades, and a scoring patterns booklet included. This is a brilliant gift for yourself or any bread-obsessed friend.
The Steam Problem: Your Oven Might Be Sabotaging You
Here is the thing about oven spring and ear formation: none of it works without adequate steam in the first 15 to 20 minutes of baking. Steam keeps the surface of your dough soft and extensible long enough for it to expand dramatically before the crust sets. Without steam, the crust hardens too fast, your score seals shut, and you get that sad, smooth dome.
The Dutch Oven Method
If you are baking in a covered Dutch oven, you are already trapping the steam released by the dough itself, which is the simplest and most reliable method. Bake covered at a high temperature, around 230 to 250 degrees Celsius, for the first 20 minutes. Then remove the lid for the final 20 to 25 minutes to develop your crust and color. If your ear still is not forming, make sure your Dutch oven is fully preheated before you load the dough in.
A Cold Dutch Oven Is a Silent Killer
Loading cold dough into a cold pot is one of the most common ear-killing mistakes. Your pot should be scorching hot. Preheat it in the oven for at least 45 minutes to an hour. The thermal shock when your dough hits that hot surface gives it an immediate burst of oven spring that helps the ear lift dramatically.
Check Your Dough Temperature and Proofing State
Overproofed dough has already exhausted much of its gas and structural tension. When it hits the oven, there is little energy left to push that ear open. Aim to bake your loaf when it is properly fermented but still has some spring left in it. A gentle poke test, where the dough springs back slowly but not immediately, is your best guide.
A Quick Troubleshooting Checklist Before Your Next Bake
- Replace your blade with a fresh one before every bake or every second bake at most
- Score at a 30 to 45 degree angle, low and nearly parallel to the dough surface
- Use one fast, confident stroke rather than multiple slow passes
- Preheat your Dutch oven for at least 45 to 60 minutes at full temperature
- Bake covered for the first 20 minutes to trap steam
- Do not overproof — bake while the dough still has tension and energy
- Score depth should be about 1 to 1.5 centimetres, not too shallow and not too deep
The Happy Ending: Loaf Number Fifteen
So back to that miserable morning and my fourteen earless loaves. After my friend called me out on my hesitation, I did three things: I swapped in a brand new blade, I drilled the low-angle motion on a piece of paper towel until it felt natural, and I added an extra 15 minutes to my Dutch oven preheat time. That was it. Those three tiny adjustments.