- Use your starter at true peak activity, when it has doubled and is domed on top, not past its peak and starting to deflate.
- Ceylon cinnamon is genuinely worth the swap from regular cinnamon for a warmer, less bitter flavor in the swirl.
- Do not rush the cold proof. Overnight in the fridge develops flavor and makes scoring and oven spring so much better.
- Adding a tiny bit of softened butter to the dough itself (not just the swirl) gives the crumb a slightly softer, more enriched texture that pairs perfectly with the raisins.
- If your r
It was 7 a.m. on a Saturday when my neighbor Linda rang my doorbell holding an empty bread bag and what I can only describe as desperate eyes. I had given her a loaf of my sourdough cinnamon raisin bread three days earlier as a “sorry my dog dug up your tulips” peace offering, and apparently that loaf had disappeared in under 48 hours. She wanted to know if I had another one. I did not. What I did have was flour in my hair, a starter that had just peaked, and approximately zero regrets about accidentally starting a neighborhood obsession with this sourdough cinnamon raisin bread recipe. If you have been searching for a loaf that is soft, deeply fragrant, studded with plump raisins, and swirled with cinnamon sugar in a way that makes people show up at your door unannounced, you have found it.
This post contains affiliate links. As an Amazon Associate, I earn from qualifying purchases.
The Loaf That Started a Neighborhood Situation
Okay, let me back up a little, because the full story is better than the ending. A few months ago, I was going through what I now refer to as my “ambitious phase” in the kitchen. I had been baking sourdough for about a year and felt genuinely unstoppable. I decided to attempt a cinnamon raisin loaf on a whim, using a method I half-remembered from a video I had watched while also eating dinner. I did not write anything down. I eyeballed the cinnamon. I forgot to soak the raisins. I also, in a choice I still cannot explain, added the cinnamon swirl filling way too early in the shaping process, which meant it completely disappeared into the dough and basically seasoned the whole loaf like a sad, invisible ghost of a swirl.
The loaf looked fine on the outside. Inside it was dense, the raisins were chewy little pebbles, and the cinnamon flavor was just barely there. My husband ate two slices and said it was “interesting,” which is the polite version of “please never make this again.” I gave the rest to Linda as the aforementioned tulip apology because I figured, you know, it was still bread. That part of the story ends there.
But here is the thing about failure in sourdough baking: it teaches you more than success ever does. I went back, I took actual notes this time, and I figured out exactly where I went wrong. The result of all that figuring out is what Linda now refers to as “the loaf.” And it is very, very good.
What You Will Need for This Sourdough Cinnamon Raisin Bread Recipe
Ingredients
- 450g bread flour
- 325g warm water (divided: 300g for dough, 25g reserved)
- 100g active sourdough starter (at peak, bubbly and doubled)
- 9g fine sea salt
- 150g raisins (soaked, then patted dry)
- 2 tablespoons unsalted butter, softened (optional but wonderful)
- Cinnamon swirl filling: 2 tablespoons softened butter, 3 tablespoons granulated sugar, 2 teaspoons ground Ceylon cinnamon
My Gear and Recommended Products
For the raisins, I rotate between a few favorites depending on what I have on hand. My everyday go-to is Sun-Maid California Sun-Dried Raisins, the 2-pack 32 oz resealable bags, because they are plump, reliable, and I go through them fast enough that buying in bulk makes complete sense. If I am feeling a little fancy or baking for a gift loaf, I reach for Yupik Organic California Flame Raisins, which are naturally sweet, non-GMO, and have this slightly deeper flavor that works beautifully in sourdough. And when I want something a little more striking in the crumb, NUTS U.S. California Black Raisins are gorgeous and add a bold, jammy sweetness with zero added sugar.
For cinnamon, please do yourself a favor and use Ceylon cinnamon rather than the standard cassia variety. It is warmer, more floral, and less harsh. I keep two on rotation: Simply Organic Ceylon Ground Cinnamon for smaller batches and everyday baking, and Anthony’s Organic Ceylon Cinnamon Powder, the one-pound bag, when I am baking multiple loaves in a week. Both are non-GMO, gluten free, and genuinely fragrant in a way that makes your whole kitchen smell like a hug.
How to Make It: The Method That Actually Works
Step 1: Soak Your Raisins (Do Not Skip This)
This was mistake number one in my original disaster loaf. Dry raisins will rob moisture from your dough and bake up tough and chewy. Soak them in warm water for 30 minutes, then drain and pat them completely dry before using. This one step makes a dramatic difference in the final texture. The raisins will be soft, almost jammy, and they will integrate into the crumb rather than fighting against it.
Step 2: Mix and Autolyse
Combine your flour and 300g of the water and let it rest for 45 minutes. This autolyse period allows the flour to fully hydrate and starts building gluten without any effort from you. After the rest, add your active starter and the reserved 25g of water with your salt dissolved in it. Dimple everything together and then do a series of stretch and folds to develop strength.
Step 3: Bulk Fermentation and Adding Raisins
During bulk fermentation, which typically takes 4 to 6 hours at around 75 degrees Fahrenheit, you will do four sets of stretch and folds every 30 minutes in the first two hours. Add your drained, dried raisins during the second or third set of folds, gently folding them in so they distribute evenly without tearing the dough structure. The dough is ready to shape when it is puffy, domed, and has grown by about 50 to 75 percent.
Step 4: The Cinnamon Swirl (Timing Is Everything)
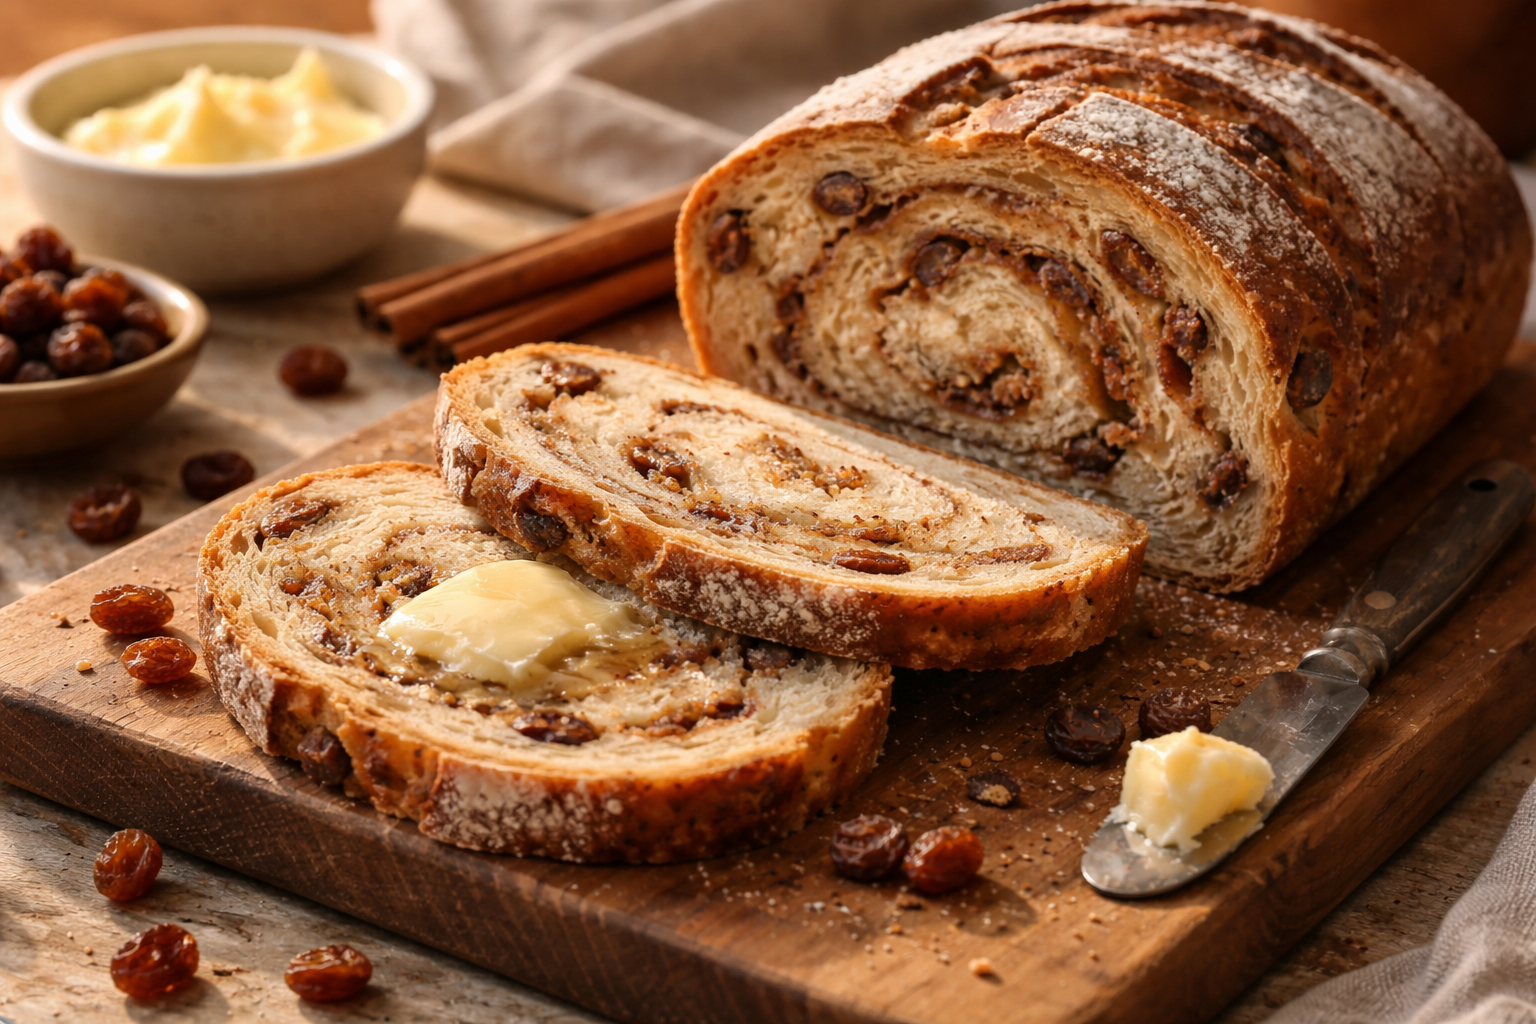
Here is where past me went terribly wrong, and where present me has it all figured out. After your bulk fermentation, turn the dough out onto an unfloured surface and gently press it into a rough rectangle. Spread your cinnamon sugar butter filling evenly over the surface, leaving about a half inch border. Now, tightly roll the dough into a log from the short end, then fold that log in thirds like a letter before placing it seam-side down in your proofing basket. This method creates a visible, beautiful swirl without the filling leaking into the dough structure and disappearing entirely. Score it generously before baking so the swirl has room to bloom.
Step 5: Bake
Cold proof your shaped loaf in the refrigerator overnight, anywhere from 8 to 16 hours. Preheat your oven to 500 degrees Fahrenheit with your Dutch oven inside for at least 45 minutes. Bake covered for 20 minutes, then uncover and reduce to 450 degrees for another 20 to 25 minutes until the crust is deeply golden. The internal temperature should reach around 205 degrees Fahrenheit. Let it rest for at least one hour before slicing. I know. It is hard. Do it anyway.
Tips for Getting the Best Results Every Time
- Use your starter at true peak activity, when it has doubled and is domed on top, not past its peak and starting to deflate.
- Ceylon cinnamon is genuinely worth the swap from regular cinnamon for a warmer, less bitter flavor in the swirl.
- Do not rush the cold proof. Overnight in the fridge develops flavor and makes scoring and oven spring so much better.
- Adding a tiny bit of softened butter to the dough itself (not just the swirl) gives the crumb a slightly softer, more enriched texture that pairs perfectly with the raisins.
- If your r