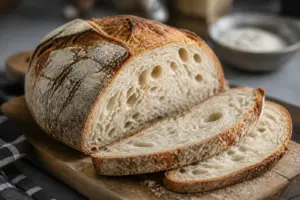
For the first two years I baked sourdough seriously, every loaf I cut open looked the same: a tight, uniform crumb that tasted fine but told me nothing had really worked. I was following the right hydration numbers, using the right flour, even timing my bakes obsessively with a spreadsheet. And yet the crumb stayed closed. Dense. Polite. Boring.
I want to be honest with you about what finally changed things, because it was not one dramatic discovery. It was a slow accumulation of understanding — most of it earned by ruining loaves in very specific, instructive ways. After eleven years of baking sourdough, three of those running a home microbakery at 40 to 60 loaves a week, I can tell you exactly what opens a crumb and what closes it. This is that post.
Why Most Bakers Never Get an Open Crumb
The open crumb problem is almost never a single variable. That is what makes it so maddening. Most bakers zero in on hydration — they read that high-hydration doughs produce open crumbs, bump their formula to 80% or 85%, and watch the dough become unmanageable without any payoff in the final loaf. Hydration matters, but it is probably fourth or fifth on the list of things that actually drive crumb structure.
What actually drives crumb openness is gluten network quality, fermentation timing, and shaping technique — in roughly that order. If any one of those is off, the other two cannot save you. And most home bakers are unknowingly getting all three wrong at the same time.
Start With the Flour — This One is Non-Negotiable
I spent months chasing crumb structure while using all-purpose flour because I had read that some bakers preferred it. That was a mistake. Open crumb sourdough bread — how to actually achieve it — begins with a flour that has enough protein content to build a strong, extensible gluten network. You need something in the 12% to 13% protein range minimum.
For the last several years I have standardized on King Arthur 100% Organic Bread Flour, Unbleached, 5 lb. King Arthur’s bread flour comes in at about 12.7% protein and is milled with remarkable consistency — consistency that matters when you are baking enough loaves to notice variation. If you bake frequently, the King Arthur 100% Organic Bread Flour, 5 lb, Pack of 2 is the better value and keeps well in a sealed container. The organic, non-GMO, preservative-free specs matter to me personally, but the performance is what kept me loyal.
Flour is the foundation. Do not try to optimize shaping or fermentation on a flour that cannot support a strong gluten network. You will be solving the wrong problem.
Fermentation Is Where Most Bakers Go Wrong
If I had to name the single most common mistake I see in bakers chasing an open crumb, it is under-fermentation. Not over — under. There is an enormous amount of fear around over-proofed dough in sourdough communities, and that fear causes bakers to pull their dough out of bulk fermentation too early, consistently and repeatedly, bake after bake.
Under-fermented dough has not developed enough gas production or enough acid to properly relax the gluten. When you score it and it hits the oven, the structure cannot expand freely. You get burst ears, dense crumbs, and a gummy interior — even if your shaping was perfect.
Here is what I actually watch for at the end of bulk fermentation:
- The dough has increased by 50% to 75% in volume — I use a straight-sided clear container with a rubber band to track this precisely
- The surface is domed, slightly jiggly, and shows visible bubbles
- When I pull the dough away from the side of the container, I can see a web-like, open internal structure
- The dough feels airy and light in my hands, not dense and tight
Temperature controls everything here. At 78°F ambient, my bulk fermentation typically runs 4 to 5 hours after peak starter. At 68°F in winter, it can be 8 to 10 hours. I do not trust clocks. I trust the dough.
Shaping for Structure, Not Just Appearance
This is where I wasted the most time early on. I was shaping for a pretty boule without understanding what shaping is actually doing mechanically. Good shaping creates surface tension — a taut outer skin that traps gas during proofing and oven spring. Without it, gas escapes, the structure collapses inward, and your crumb closes up.
The technique that changed my shaping was the lamination step, which I added during bulk fermentation. Around the third hour, I turn the dough out onto an unfloured surface, stretch it into a thin rectangle, fold in inclusions if I am using any, then fold it back into a package. The surface tension this creates before final shaping is significant. Chad Robertson describes a version of this in Tartine Bread, and after experimenting with it across hundreds of loaves during my microbakery years, I am convinced it is not optional if you want a genuinely open crumb.
For pre-shaping and final shaping, a good bench scraper is essential — not as a luxury, but as a functional tool. You need something that grips the dough cleanly and lets you build tension with drag motions across the counter. I have been using the Amazon Basics Multi-Purpose Bench Scraper, Stainless Steel with Measurement Marks for years. It is stiff, easy to clean, and the non-slip grip gives you control during high-hydration shaping sessions when dough wants to stick and spread. Nothing fancy — just a tool that works.
The Score Matters More Than You Think
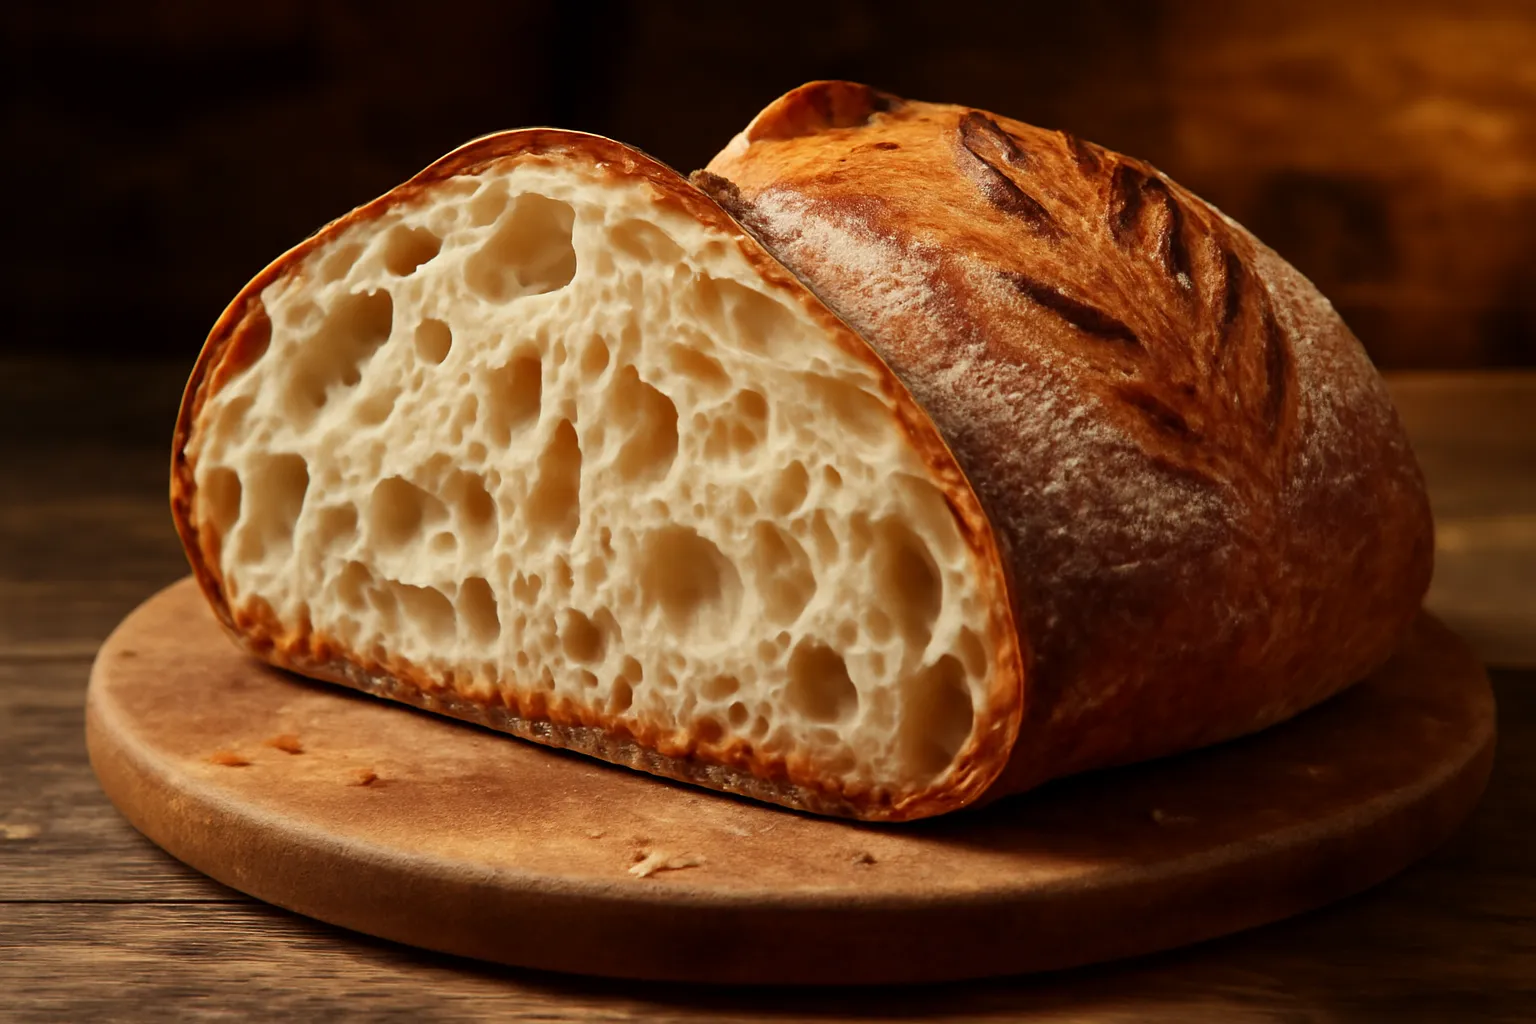
I used to believe scoring was mostly aesthetic. That changed when I started paying attention to how different scores correlated with different crumb structures across the same batch of loaves. Your score is a pressure release valve. If it is too shallow or placed incorrectly, oven spring gets redirected sideways instead of upward, and the crumb compresses laterally instead of opening vertically.
For maximum crumb openness, I score at a steep angle — roughly 30 to 35 degrees from vertical — with a single confident stroke, about 3 to 4 inches long, using a fresh lame blade. Dull blades drag. Dragged scores close the crumb. Replace your blades more often than you think you need to.
An Honest Caveat
Here is something I want to say plainly: an open crumb is genuinely harder to achieve with whole grain flours, enriched doughs, or any formula with significant additions like seeds or nuts. I baked a 40% whole wheat loaf every week for two years at the microbakery because customers loved it, and the crumb was never as open as my white flour loaves — and it should not be. The bran physically cuts gluten strands. That is physics, not failure. If you are working with whole grain and chasing a wild open crumb, you are working against the grain (no pun intended). Adjust your expectations, not just your technique.
What I Use
After eleven years, these are the tools and ingredients I actually rely on for consistent open crumb results:
- King Arthur 100% Organic Bread Flour, Unbleached, 5 lb — my daily driver flour for high-hydration sourdough
- King Arthur 100% Organic Bread Flour, 5 lb, Pack of 2 — better value for regular bakers
- Amazon Basics Stainless Steel Bench Scraper with Measurement Marks — essential for high-hydration shaping and pre-shaping tension
This post contains affiliate links. As an Amazon Associate I earn from qualifying purchases.
The Summary That Actually Matters
If you are trying to understand open crumb sourdough bread how to get it consistently, the honest answer is this: stop chasing hydration percentages and start auditing your fermentation, your flour, and your shaping in that order. The crumb you want is already in the dough — your job is to stop collapsing it before it gets to the oven.
It took me two years of frustration and several hundred mediocre loaves to internalize that. I hope this saves you some of that time. Keep baking, keep observing, and trust your hands more than any timer.
The Flour That Finally Opened My Crumb
I spent months thinking my technique was the problem, when really I was fighting my flour. The protein content and ash levels matter more than I’d admitted, and switching to a flour specifically milled for open crumb sourdough made a difference I could see the moment I pulled the loaf from the Dutch oven.
What works
- The protein content (around 12.7%) is high enough to handle extended fermentation without collapsing, but not so aggressive that it fights extensibility during shaping.
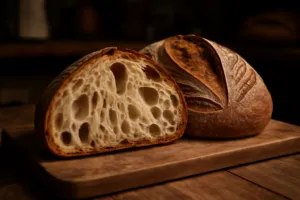
- I noticed larger, more irregular holes forming by hour 4 of bulk fermentation — the kind of honeycomb structure that was invisible with my previous all-purpose blends.
- The organic milling seems to preserve enzyme activity in a way that encourages gluten development without over-processing, which means my dough felt more alive during lamination.
What doesn’t
- It’s noticeably more expensive than standard bread flour, which adds up fast if you’re baking multiple times a week (I was going through a bag every four days).
- The hydration sweet spot sits around 78–80%, which is higher than I expected — I had to recalibrate my dough feel entirely or risk overproofing and a slack, shapeless mass.
I was skeptical that flour alone could fix what I’d blamed on my hands for two years, and my first loaf was actually slightly over-hydrated and gummy inside. But once I adjusted my percentages and trusted the dough, everything clicked. Pick up a bag of King Arthur 100% Organic Bread Flour, Unbleached, 5 lb and see if your crumb opens up the way mine did.
This post contains affiliate links. As an Amazon Associate, I earn from qualifying purchases at no extra cost to you.