I still remember standing at my kitchen counter at 7 a.m. on a Saturday, staring into my Dutch oven like I had personally offended it. I had stayed up late the night before, carefully shaped what I was convinced would finally be my best loaf ever. I had a strong starter, good flour, perfect timing. I lifted the lid after the first bake, and there it was: a pale, dense, gummy brick with a crumb so tight it could double as a doorstop. I actually laughed. Then I sat down and ate a piece with butter and felt genuinely defeated. If you have ever been chasing that gorgeous high hydration sourdough open crumb and ended up with something that looked more like sandwich bread gone wrong, welcome. You are in exactly the right place.
This post contains affiliate links. As an Amazon Associate, I earn from qualifying purchases.
That loaf was number eleven in a row that had failed to give me the open, lacey, almost wild interior I kept seeing on Instagram and in every sourdough book on my shelf. I was starting to think that crumb was simply impossible to achieve without a commercial deck oven, a steam injection system, and maybe a culinary degree. Spoiler: it is absolutely possible at home. But it took me a lot of flour, a lot of patience, and one very specific set of technique adjustments to get there.
Why High Hydration Dough Is So Frustrating (And So Worth It)
High hydration sourdough typically means doughs in the 75% to 85% hydration range, sometimes higher. More water means more steam trapped inside the loaf as it bakes, which is what creates those gorgeous, irregular holes and that thin, delicate crumb structure that tears apart so beautifully. It also means the dough is slack, sticky, and completely uncooperative when you are learning to handle it.
The problem most home bakers run into is not the recipe itself. It is the technique. High hydration dough punishes every shortcut. Under-fermented? Dense crumb. Weak shaping? Flat loaf that spreads sideways. Wrong baking vessel? No oven spring. I know this because I made every single one of those mistakes, sometimes all in the same loaf.
The good news is that each one of those problems has a concrete fix, and once things click, the results are honestly breathtaking. There is nothing quite like pulling a loaf out of the oven that looks like something from a proper artisan bakery, knowing you made it in your home kitchen with a regular oven.
What You Will Need: My Gear for High Hydration Sourdough Open Crumb Success
Before we talk technique, let me walk you through the tools that genuinely made a difference for me. The biggest game changer was my baking vessel. I had been using a covered roasting pan, and while it worked okay, switching to a proper cast iron combo cooker completely transformed my oven spring and crust development.
The vessel I reach for most often is the Lodge Cast Iron Combo Cooker. It is a 2-in-1 set with a 3.2 quart deep pot and a 10.25 inch skillet that doubles as the lid. The genius of this design is that you bake the loaf seam-side down in the shallow skillet, which makes scoring and loading so much easier. It is PFAS-free and made in the USA, which I appreciate. This is the one I use almost every week.
If you want something with a bit more personality, Lodge also makes the Lodge Wanderlust Cabin Combo Cooker, which is the same 3.2 quart design with a beautiful cabin-inspired aesthetic. It performs identically and honestly looks gorgeous on a kitchen shelf.
For those who prefer a more traditional Dutch oven setup, the Lodge Cast Iron Double Dutch Oven is a fantastic 5 quart option. The lid doubles as a skillet here too, and the extra volume gives larger loaves plenty of room to spring up.
The other tool I consider non-negotiable for high hydration dough is a good bench scraper. Sticky, wet dough needs to be coaxed and shaped rather than handled roughly, and a bench scraper lets you do that without adding extra flour that would throw off your hydration. I keep two on hand: the Amazon Basics Stainless Steel Bench Scraper for basic dough work and portioning, and the Ecavria Bench Scraper Set, which comes with two flexible bowl scrapers that are incredibly helpful for getting every bit of dough out of your bulk fermentation container.
The Technique Adjustments That Actually Worked
1. Nail Your Bulk Fermentation Before Anything Else
This was the root cause of almost all of my failures. I was cutting bulk fermentation short because my kitchen was cool and I was impatient. For a genuinely open crumb, you need the dough to ferment until it has grown noticeably, feels airy when you handle it, and passes the poke test. In a 68 to 70 degree kitchen, that can take anywhere from 10 to 14 hours for an overnight bulk. Do not rush this. Set a timer if you have to, but trust the dough, not the clock.
2. Build Strength Through Coil Folds, Not Aggressive Kneading
High hydration dough needs gluten development, but it cannot handle the pounding that lower hydration doughs can take. My turning point was switching from stretch-and-fold to coil folds during bulk fermentation. Wet your hands, slide them under the dough in the container, lift it up so it hangs and folds under itself, then rotate the container 90 degrees and repeat. Do four sets of coil folds spaced about 30 minutes apart during the first two hours of bulk. You will feel the dough tighten and become more elastic with each set.
3. Shape Confidently and Quickly
This is where my bench scrapers earn their place on the counter. Lightly flour your surface, turn the dough out, and use the bench scraper to pre-shape it into a rough round. Let it rest uncovered for 20 to 30 minutes. Then do your final shape quickly and with intention. Use the scraper to drag the dough toward you on an unfloured surface, building surface tension. A tight, smooth skin on the outside is what gives the loaf structure to hold those open cells inside.
4. Cold Proof Overnight in the Fridge
After shaping, place the dough seam-side up in a well-floured banneton or a bowl lined with a floured kitchen towel. Cover it with a shower cap or plastic wrap and put it straight into the refrigerator for 8 to 16 hours. Cold retarding slows fermentation, lets flavors develop, and makes the dough much easier to score. It also firms up the loaf so it holds its shape when you load it into your hot Dutch oven.
5. Bake Hot, Covered, Then Uncovered
Preheat your oven to 500 degrees Fahrenheit with your cast iron combo cooker inside for at least 45 minutes. Turn the cold dough out onto parchment paper, score it quickly with a sharp lame or razor blade at a 30 to 45 degree angle, and lower it into the hot skillet using the parchment as a sling. Cover it and bake for 20 minutes. Then remove the lid, drop the temperature to 450 degrees, and bake for another 20 to 25 minutes until the crust is deeply golden and the internal temperature reaches around 205 to 210 degrees.
The Morning Everything Finally Worked
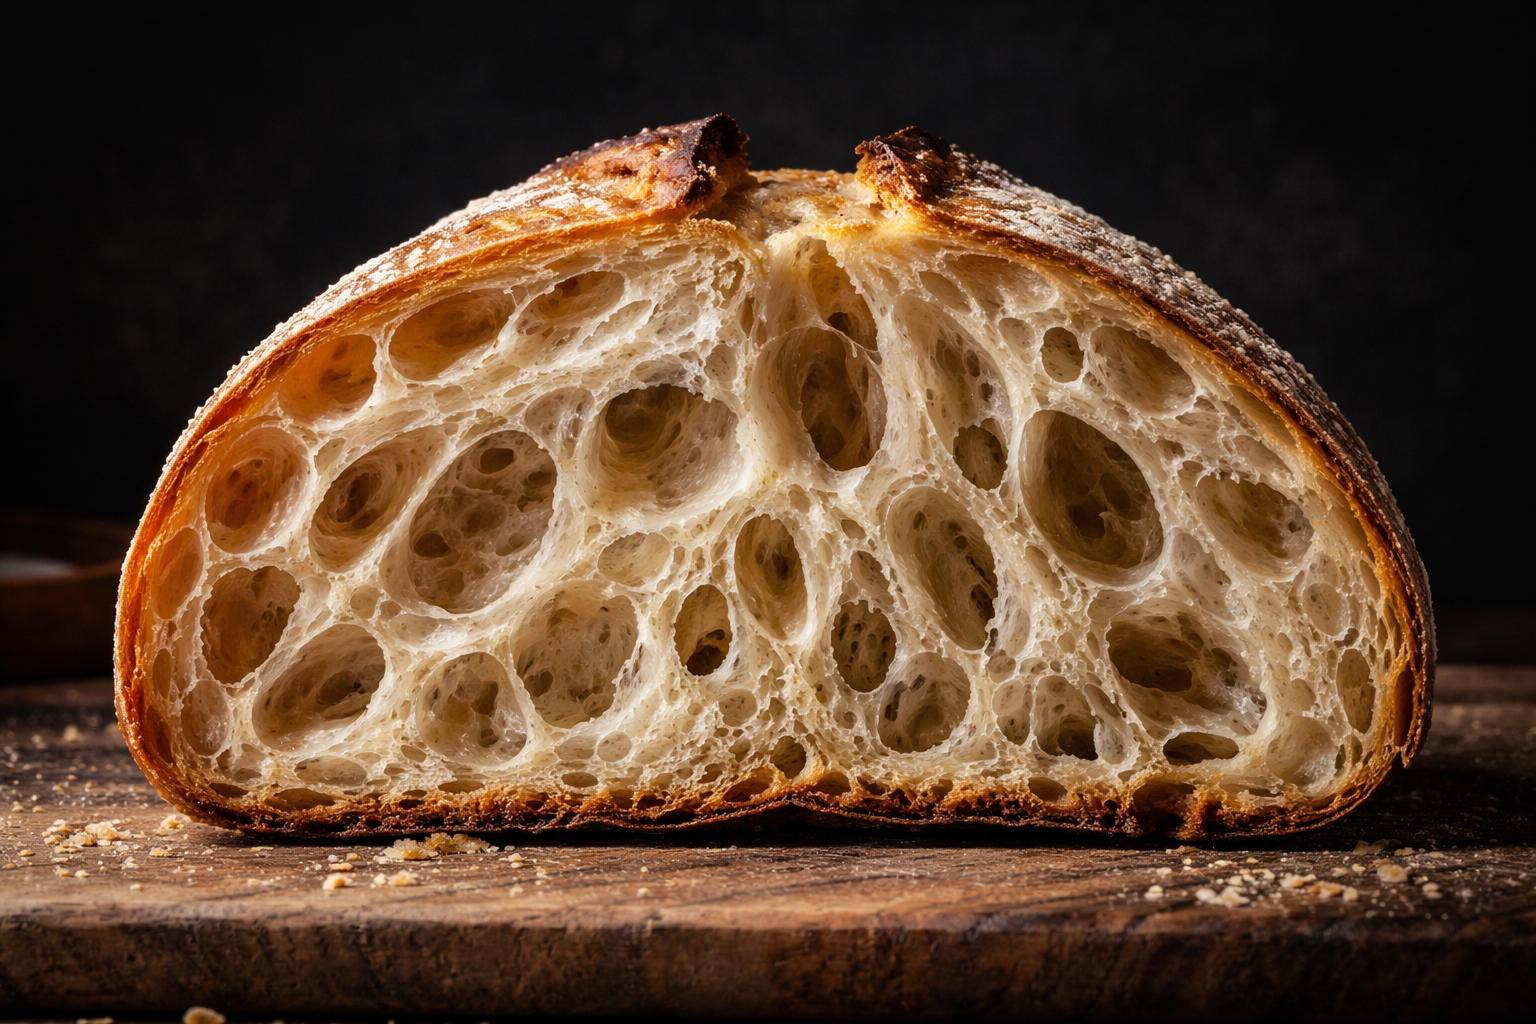
About three weeks after that failed doorstop loaf, I woke up early on a Sunday morning and went through every step of this updated process. I had done a long, slow bulk ferment overnight in a slightly warmer spot in my kitchen. I had done my coil folds. I had shaped it with confidence instead of anxiety and put it in the fridge the night before. When I pulled the lid off the Dutch oven that morning, I actually gasped. The loaf had cracked open along the score in this dramatic, wild ear. The crust was a deep, burnished auburn. And when I finally cut into it after letting it cool for two full hours (the hardest part, honestly), there it was: the open, irregular, almost lace-like crumb structure I had been chasing for months.
I took about fifteen photos. I texted my mom. I ate two slices standing at the counter with nothing but good olive oil. It was one of those small, completely disproportionate joys that home baking is full of.
If you are still chasing that high hydration sourdough open crumb at home, please do not give up. The gap between a dense loaf and a gorgeous, lacey crumb is almost always technique, not talent, and definitely not your oven. Work through these adjustments one at a time, invest in a good cast iron vessel