It was 6:47 on a Sunday morning and I was standing in my kitchen in my bathrobe, holding a lump of dough that could only be described as a deflated football, whispering “please, please, please” to it like that was going to help. My starter had gone rogue. My bulk ferment had overproofed overnight. My husband was already awake and helpfully suggesting we “just buy a loaf from the store.” Reader, I nearly cried into my banneton.
That was eighteen months ago, and it was the exact moment that accidentally led me to discovering the weekend sourdough bake schedule that has genuinely transformed how I spend my Saturdays and Sundays. I know that sounds dramatic. But stay with me, because this is a story that ends with golden crust, an apology loaf for my husband, and zero Sunday morning bathrobe meltdowns.
Why My Old Weekend Schedule Was Setting Me Up to Fail
For a long time, I was doing what I thought made sense: mix on Saturday morning, bake on Saturday afternoon. Simple, right? Except “Saturday afternoon” kept turning into “Saturday evening” because my kitchen runs warm, my bulk ferment was always either racing ahead or dragging behind, and I had absolutely no margin for error. I was a hostage to my dough every single weekend.
The real problem was that I had no predictability. Some weeks the bread came out beautifully. Other weeks I got dense, gummy crumbs and a crust that sounded hollow but tasted like sadness. I blamed my flour. I blamed my starter. I briefly blamed my oven (sorry, oven). What I never considered was that the issue was my timing, not my technique.
That deflated-football Sunday was actually my third failed loaf in a row, which is why I was whispering to the dough like a person who has completely lost the plot. I had overproofed it again because I went to bed thinking “it needs a couple more hours” and woke up to fermentation chaos. Something had to change.
The Friday-Night-Mix, Saturday-Morning-Bake Weekend Sourdough Bake Schedule
I stumbled onto the Friday night mix almost by accident. After Deflated Football Sunday, I decided to try a cold retard approach I had been reading about but kept putting off. I mixed my dough on a Friday evening, did my stretch and folds, let it bulk ferment at room temperature for about four hours, shaped it, and then tucked it into the refrigerator overnight in my proofing basket. I went to bed fully expecting to have failed again by morning.
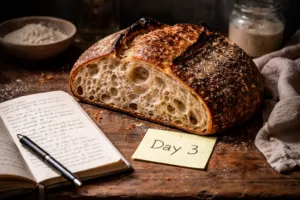
Saturday morning, I pulled that cold dough out of the fridge, preheated my Dutch oven, and baked it. And it was… perfect. Like, embarrassingly, stupidly perfect. The oven spring was dramatic. The ear on the score was bold and proud. The crumb was open and chewy. I texted my sister a photo before I even cut into it.
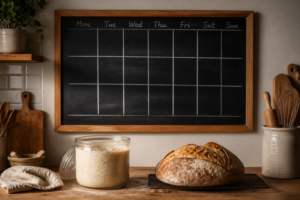
Here is the schedule I now follow every single weekend, and it is so repeatable I could do it in my sleep (which, let’s be honest, on Friday nights, I practically am):
Friday Evening Timeline
- 7:00 PM: Feed your starter so it is active and ready. I aim for a 1:5:5 ratio on Friday evenings so it peaks a little slower.
- 9:00 to 10:00 PM: Mix your autolyse, then incorporate your starter once it has peaked. Add salt and do your initial mixing.
- 10:00 PM to 2:00 AM (hands-off): Perform 3 to 4 sets of stretch and folds during the first hour and a half, then leave the dough to bulk ferment at room temperature. In my kitchen, which runs around 70 to 72 degrees Fahrenheit, four hours of bulk ferment is my sweet spot. Your kitchen may vary.
- Before bed (roughly 11:00 PM to midnight): Shape your dough, place it in your floured banneton, cover it, and transfer it to the refrigerator for an overnight cold retard.
Saturday Morning Timeline
- 8:00 AM: Place your Dutch oven in the oven and preheat to 500 degrees Fahrenheit for a full 45 to 60 minutes. Do not rush this step.
- 8:45 to 9:00 AM: Pull your dough straight from the fridge, score it cold (cold dough scores beautifully, by the way, this was a revelation), and load it into your screaming hot Dutch oven.
- Bake: 20 minutes covered at 500F, then remove the lid, drop to 450F, and bake another 20 to 25 minutes until deep golden brown.
- By 9:30 AM: Your bread is out of the oven and cooling on a wire rack. You are still in your pajamas. You have the entire day ahead of you. Life is good.
The cold retard does something magical for both flavor and scheduling. The slow overnight fermentation in the refrigerator develops a more complex, tangy flavor profile, tightens the gluten structure, and basically puts the dough on pause so YOU get to decide when baking happens, not the other way around. You are back in control. It is very empowering.
What You Will Need to Make This Schedule Work
Good timing is only part of the equation. Having the right containers and bakeware makes this schedule so much smoother. Here is exactly what I use:
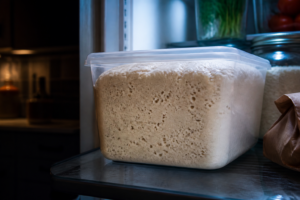
The Clear Container That Finally Let Me Stop Guessing When Bulk Ferment Is Done
You can’t watch a dough rise if you can’t actually see it. For years I fermented in opaque bowls and either underbulked or overproofed loaves half the time—until I switched to a clear container and realized how much visual information I’d been missing.
What works
- The straight sides and clear polycarbonate let you track that 50 to 75 percent rise without any guesswork—you can see the dough dome, watch for jiggle, and spot when the surface starts to look slightly dimpled.
- The volume markings on the side help you normalize your hydration and starter ratio across different bakes, which cut my “is this ready?” anxiety in half.
- It’s durable enough to handle years of daily bulk ferments without cracking, scratching, or clouding over like cheaper plastic containers do.
What doesn’t
- The lid doesn’t seal airtight, so you’ll need to cover it loosely with a kitchen towel to prevent the dough from drying out during fermentation.
- It’s tall and narrow enough that it doesn’t fit well in every fridge—I had to rearrange my shelves and I still can’t store much else on the same level.
I almost returned mine after the first week because I realized I’d been obsessively checking it every 15 minutes instead of trusting the process, but that visual confidence actually freed me from kitchen anxiety more than anything else. If you’re ready to stop guessing, grab a Cambro 6SFSCW135 Camsquare Food Container, 6-Quart with Lid.
This post contains affiliate links. As an Amazon Associate, I earn from qualifying purchases at no extra cost to you.