I still remember standing at my kitchen counter on a Sunday afternoon, staring at what was supposed to be a beautiful sourdough boule. Instead of that gorgeous, domed loaf I had spent 24 hours nurturing, I had a sad, pancake-flat disc of bread that had spread sideways across my baking sheet like it was trying to escape. If you’ve ever Googled “sourdough spreading flat not rising,” there’s a good chance you were standing in my exact spot, flour on your apron, wondering where everything went wrong.
That loaf was my fourth attempt in two weeks. I had used two cups of my precious starter, a full bag of bread flour, and most of my Saturday. When I pulled the lid off my Dutch oven and saw that flat, dense disk staring back at me, I genuinely sat down on the kitchen floor for a minute. I’m not exaggerating. The dog came over to check on me. It was a low point.
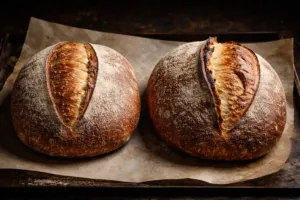
But here’s the thing: that failure was actually the turning point that made me a genuinely better baker. I figured out exactly what was going wrong, fixed it systematically, and now I bake loaves I’m genuinely proud of. Let me save you a few bags of flour and walk you through everything I learned.
Why Is My Sourdough Spreading Flat Not Rising? The Real Culprits
Flat sourdough almost always comes down to one of three root problems: weak gluten structure, over-fermentation, or shaping issues. The frustrating part is that these three things are deeply connected, so it can feel like everything went wrong at once. Let me break each one down.
Weak Gluten Development
Gluten is the network of proteins that gives your dough the strength to hold gas bubbles and rise upward rather than outward. If that network is weak or underdeveloped, your dough simply cannot hold its shape. This was my exact problem. I was mixing my ingredients, doing a couple of lazy stretch-and-folds, and moving on. I thought I was being patient. I was actually being careless.
The fix is committing fully to your stretch-and-fold routine during bulk fermentation. Aim for four sets of stretch-and-folds in the first two hours, spaced about 30 minutes apart. Each set should involve grabbing the dough from one side, stretching it up firmly, and folding it over itself. Rotate the bowl and repeat on all four sides. You should feel the dough get noticeably more taut and elastic with each set. That tension is your gluten network building.
Over-Fermentation
This one broke my heart when I finally understood it, because my flat loaves were actually the result of me doing too much of a good thing. I was letting my bulk ferment go too long because I wanted to be sure it was “done.” But when dough over-ferments, the gluten structure actually breaks down. The acids produced by the bacteria start to weaken the very network you’ve been building. The dough loses its strength and, when you bake it, it spreads instead of rises.
A properly bulk-fermented dough should increase by about 50 to 75 percent in volume, feel airy and domed on top, and jiggle like Jell-O when you shake the bowl. It should not look like it doubled and then some, or have a flat, almost sticky top. Temperature matters enormously here. A warm kitchen will ferment your dough much faster than a cool one, so if your kitchen runs warm, check your dough earlier than you think you need to.
Poor Shaping Technique
Even if your gluten development is solid and your fermentation is dialed in, bad shaping can still flatten your loaf. When you shape, you’re creating surface tension on the outside of the dough that helps it hold its form during the final proof and the early stages of baking. If you’re rough with the dough, or you don’t get that tight outer skin, the loaf will spread the moment it hits heat.
The goal during shaping is to be deliberate and confident. Pre-shape first, let the dough rest for 20 to 30 minutes, then do your final shape. Use your bench scraper to drag the dough toward you on an unfloured surface, letting the friction build tension. That little drag move was a genuine game-changer for me. Speaking of which, let’s talk tools.
The Banneton That Finally Stopped My Dough From Spreading Like Pancake Batter
A weak or poorly-supported proof is one of the biggest culprits behind that flat, sideways spread—and the right banneton basket makes all the difference in actually holding your dough upright during bulk fermentation and final proof. Without proper support, even perfectly developed dough will slump under its own weight.
What works
- The thick cloth liner holds dough firmly in place without it sliding or collapsing sideways, giving you actual vertical rise instead of that frustrating horizontal spread I used to get with loose towels.
- The round shape is deep enough that even if your dough does relax slightly during the final proof, it’s contained and supported—I’ve noticed my oven spring is noticeably better since I switched to a proper banneton.
- The seam sits exactly where you need it, so when you flip your dough onto your peel, it releases cleanly and lands ready to score without any last-minute adjustments that can deflate your carefully proofed loaf.
What doesn’t
- The liner can get damp and moldy if you don’t dry it properly between uses—I learned this the hard way after leaving mine damp for a few days and having to replace the cloth insert.
- It takes up real counter or fridge space, so if you’re working in a tight kitchen, you’ll need to commit to actually using it instead of defaulting back to a bowl.
I was skeptical at first that a basket would solve my spreading problem—I thought it was purely a fermentation timing issue—but the support it provides during proof genuinely changed my results. Saint Germain Bakery Premium Round Bread Banneton Basket with Liner
This post contains affiliate links. As an Amazon Associate, I earn from qualifying purchases at no extra cost to you.