I still remember the moment I sliced into what I thought was my best loaf yet — a beautifully blistered crust, a confident spring, and then… a dense, sticky, almost wet interior that stuck to the knife like paste. If you’ve been searching for a gummy sourdough crumb fix, I promise you, I have been exactly where you are. That soggy, under-baked texture is one of the most frustrating things a home baker can face, especially after an 18-hour cold ferment and all that hopeful anticipation. The good news? It’s almost always fixable, and once you understand why it happens, you’ll rarely deal with it again.
This post contains affiliate links. As an Amazon Associate, I earn from qualifying purchases.
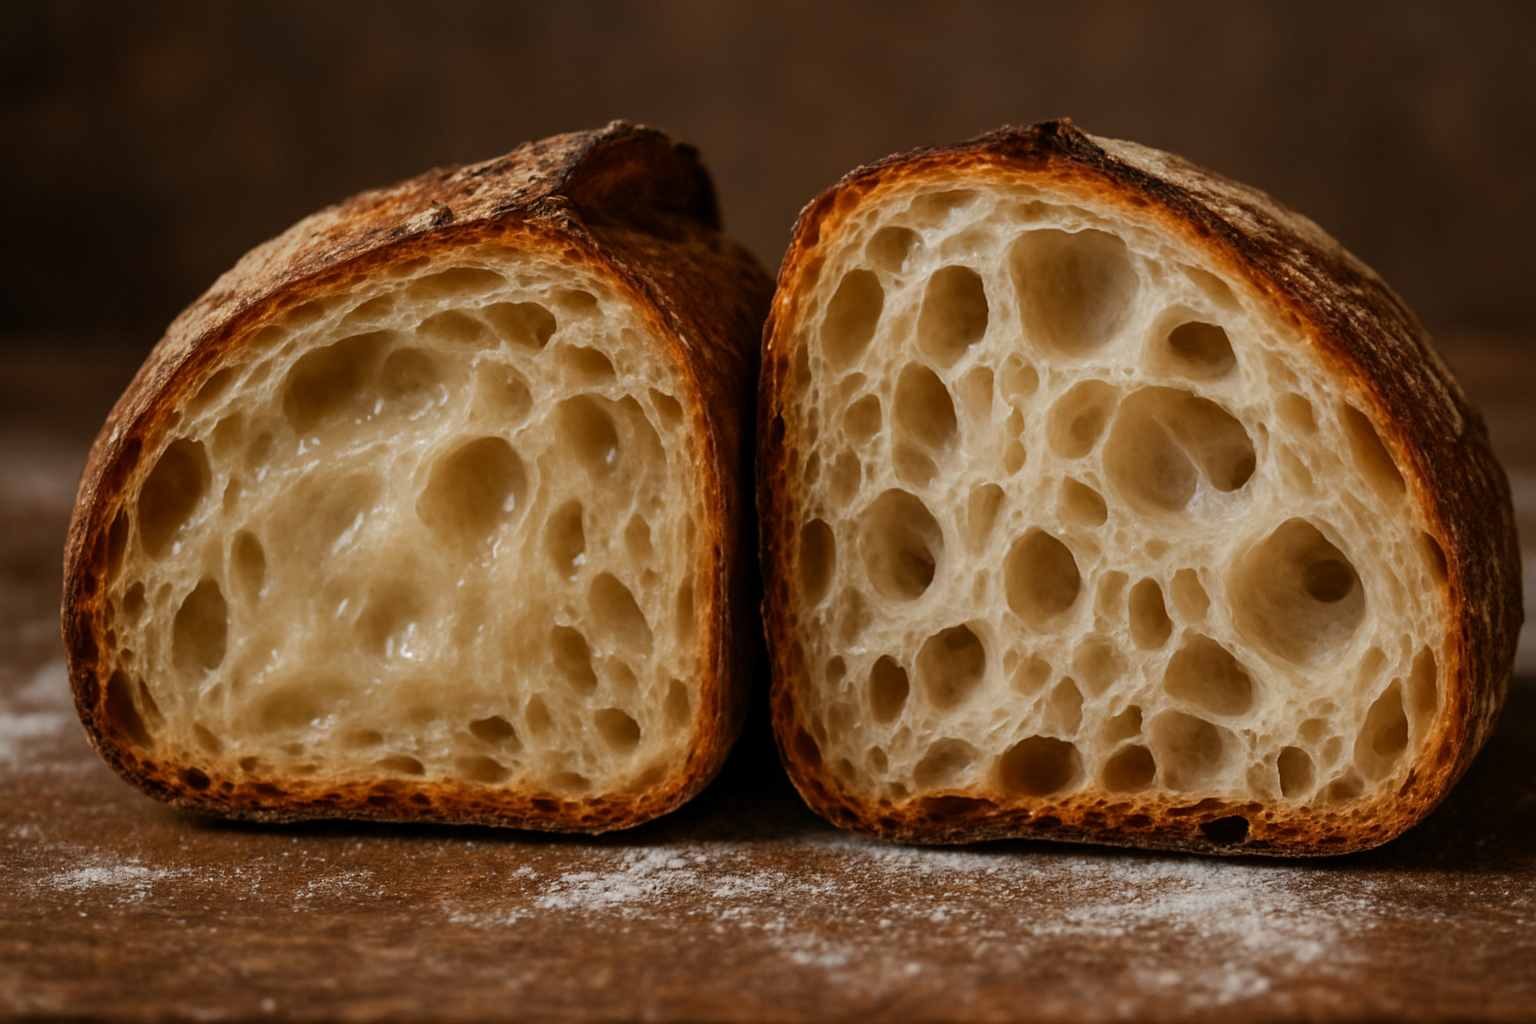
What Actually Causes a Gummy Sourdough Crumb?
Before we can fix the problem, we need to understand it. A gummy crumb is almost never caused by just one thing — it’s usually a combination of factors that conspire against you. Over the years I’ve narrowed it down to the most common culprits, and I want to walk you through each one so you can diagnose your own loaf honestly.
Underbaking Is the Number One Offender
This is the big one. Most home ovens run cooler than they claim, sometimes by as much as 25 to 50 degrees Fahrenheit. You set your oven to 500°F, you feel confident, and yet your Dutch oven never actually reaches that temperature. The outside of your loaf browns beautifully — because it’s reacting to steam and surface heat — while the interior never gets hot enough to fully gelatinize the starches and set the crumb structure. The result is that sticky, gummy texture that ruins an otherwise gorgeous loaf.
Cutting Too Soon
This one is genuinely hard to resist, but slicing into a hot loaf is one of the fastest ways to guarantee a gummy crumb. When sourdough comes out of the oven, the interior is still actively finishing its bake — steam is redistributing through the crumb, starches are completing their set, and the structure is firming up. Cut into it within the first hour and you interrupt all of that. I know the smell is overwhelming. I know you want to eat it right now. Wait at least two hours. I beg you.
Over-Fermentation and High Hydration
A dough that has over-fermented becomes slack and gassy in a way that weakens the gluten structure. When you bake an over-proofed loaf, it can collapse slightly in the oven, trapping moisture inside and creating that dense, gummy layer near the bottom. Similarly, very high-hydration doughs require longer bake times and need to be handled carefully — the extra water has to go somewhere, and if your oven isn’t hot enough or your bake time isn’t long enough, it stays right there in the crumb.
The Gummy Sourdough Crumb Fix That Actually Works
Now that we know what’s going wrong, let’s fix it. These are the exact adjustments I made in my own baking, and they transformed my loaves from gummy disappointments into the kind of open, chewy, properly-set crumb I’d been dreaming about.
Verify Your Oven Temperature — Every Single Time
Stop trusting your oven’s built-in dial. It lies. The single most impactful change I made to my baking was placing a reliable thermometer inside my oven so I could see the actual temperature before I put a single loaf in. This is not optional equipment for a serious sourdough baker — it’s as essential as your banneton.
Extend the Bake Time and Drop the Lid
Most recipes call for baking covered for 20 minutes and uncovered for another 20. If you’re struggling with a gummy crumb, extend that uncovered bake time. I often go 30 to 35 minutes uncovered, watching for a deep mahogany crust. The internal temperature of a fully baked sourdough loaf should reach 205 to 210°F. If you have an instant-read thermometer, use it — but honestly, nailing your oven temperature is the more important fix.
Cool on a Wire Rack — Completely
After baking, your loaf needs airflow on all sides to release steam properly. Setting it on a solid countertop traps moisture underneath the crust and contributes to gumminess near the bottom crumb. I always transfer my loaves straight to a wire cooling rack and leave them completely undisturbed for at least two hours — ideally longer for larger loaves.
Tools I Recommend for Fixing Gummy Sourdough
I genuinely believe that the right tools remove the guesswork from sourdough baking. Here’s what I keep in my own kitchen to make sure I never deal with a gummy crumb again.
Oven Thermometers
I recommend keeping at least one oven thermometer inside your oven permanently. There are a few great options depending on your preference. The Rubbermaid Commercial Products Stainless Steel Monitoring Thermometer has an impressive 60–580°F range and is one of the easiest to read at a glance through an oven window. If you prefer something compact and highly accurate, the Stainless Steel Analog Instant Read Oven Thermometer is battery-free, hook-and-stand versatile, and covers 100–600°F — perfect for Dutch oven baking temperatures. I also really like the AcuRite Stainless Steel Oven Thermometer, which reads from 150°F to 600°F and is a solid, no-fuss option that holds up well over time. Any one of these will genuinely change your baking results.
Cooling Racks
Proper cooling is half the battle against a gummy crumb, and a sturdy wire rack makes all the difference. I use the Heavy Duty Stainless Steel Cooling Racks (10″ x 15″, set of 2) — they’re oven-safe, dishwasher-safe, and fit a standard jelly roll pan if you need to slide them into the oven for an extra few minutes. Another excellent option is the Ultra Cuisine Stainless Steel Cooling and Baking Rack Set, which features a tight wire grid that supports even small loaves without them sinking through. Both are built to last and genuinely earn their spot on the counter.