I still remember the morning I stood over my kitchen sink, a small spoonful of starter hovering in a glass of water, watching it like it held the secrets of the universe. I had read about the sourdough starter float test in about six different places, and every source seemed to treat it like the holy grail of baking readiness. The little blob sank straight to the bottom. I panicked. I waited another hour, fed my starter again, and convinced myself I had somehow broken fermentation entirely. Sound familiar? If you’ve ever stared into a glass of water waiting for your starter to float, you are absolutely not alone — and I’m here to tell you the full, nuanced truth about what that test actually means.
What Is the Sourdough Starter Float Test?
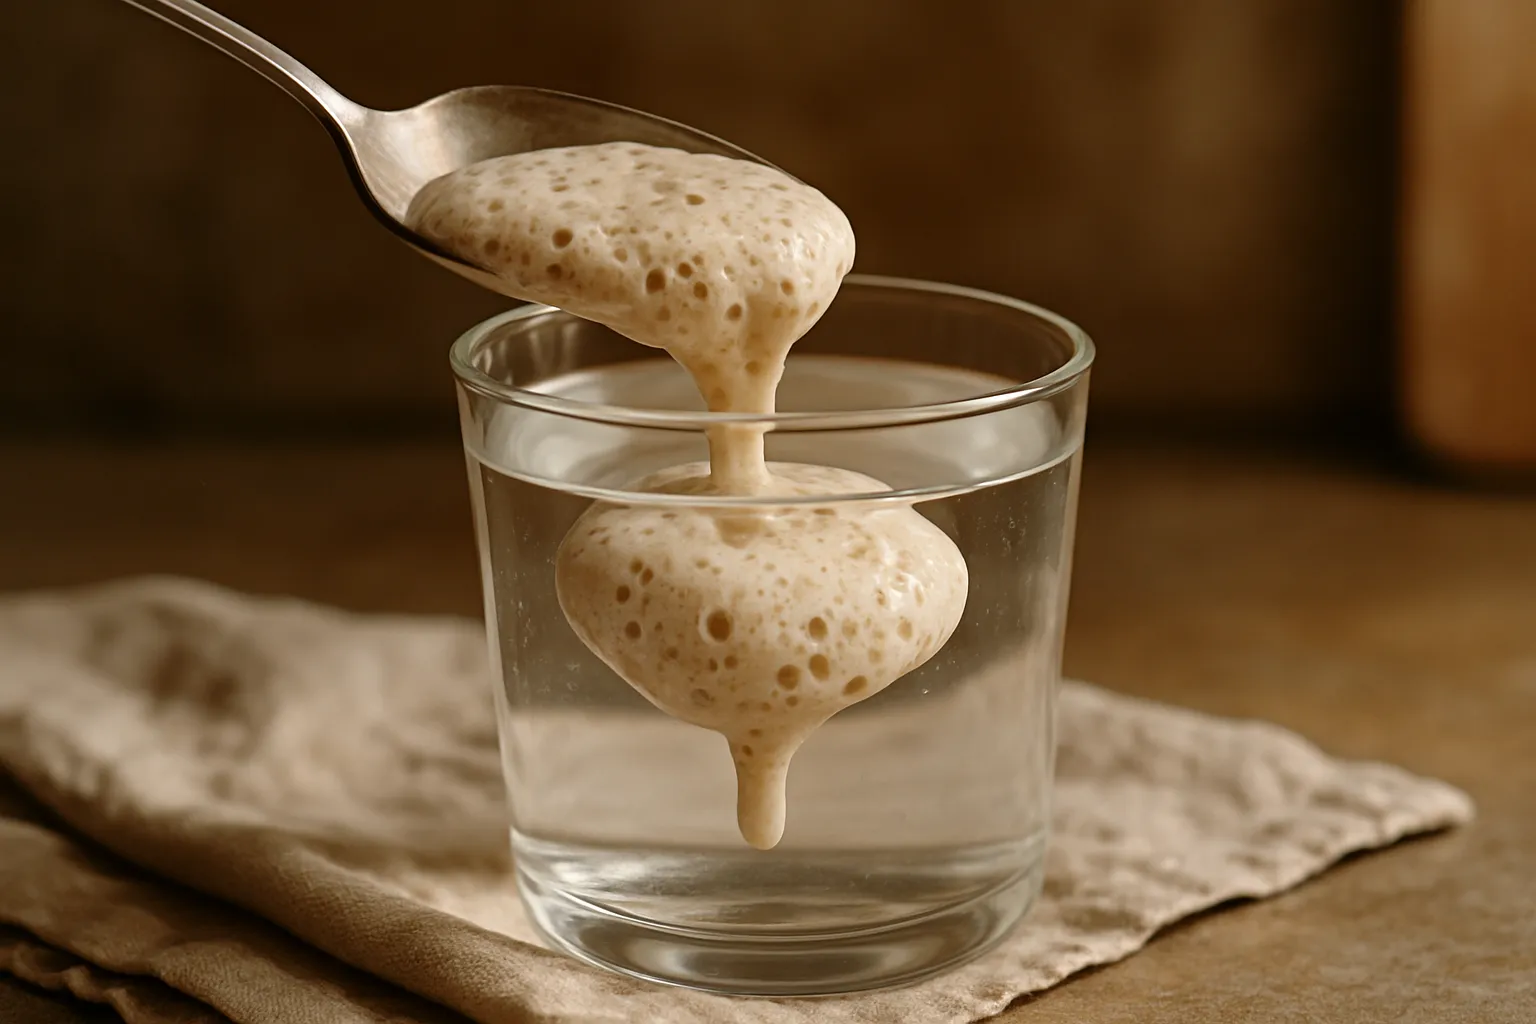
The float test is exactly what it sounds like. You drop a small spoonful of your sourdough starter into a glass of room-temperature water and watch what happens. If it floats, the conventional wisdom says your starter is active, bubbly, and ready to leaven bread. If it sinks, the story goes, your starter isn’t ready yet. Simple, right? Well, sort of.
The science behind it makes sense on the surface. When your starter is actively fermenting, the wild yeast produces carbon dioxide gas. Those gas bubbles get trapped in the gluten network of your starter, making it airy and light enough to float. A starter that sinks is theoretically too dense — not enough gas production to stay buoyant. In theory, it’s a tidy little readiness indicator. In practice, it’s a bit more complicated than that.
Why the Float Test Isn’t the Whole Story
Here’s what took me an embarrassingly long time to learn: a starter can be perfectly ready to bake with and still sink. And a starter can float beautifully while being well past its prime peak activity. The float test measures buoyancy, not fermentation strength or flavor development. Those are related things, but they are not the same thing.
A few factors that can throw off the float test results:
- Hydration level: A stiffer, lower-hydration starter (think 60–75%) is denser by nature and may not float even at peak activity. My 65% hydration starter almost never floats, but it bakes incredible loaves every single time.
- Timing relative to peak: A starter dropped in the water right at its absolute peak may float. But give it another hour past peak and it starts to deflate — the gas escapes and it sinks again, even though it was recently very active.
- Water temperature: Cold water is denser than warm water. A spoonful of starter dropped into cold tap water is less likely to float than one dropped into water around 75–80°F.
- How you scoop it: If you dig into your starter and deflate the bubbles in the process, you’re releasing the very gas that would have made it float. Scoop gently from the surface or the side of the jar.
So what should you rely on instead? Honestly, observation over time beats a single float test every day of the week. I look at the rise and fall pattern in my jar, the bubble structure throughout the starter (lots of small, even bubbles means healthy fermentation), the smell (tangy, a little fruity, pleasantly sour), and the texture (domed top at peak, starting to flatten or show concave edges when it’s past peak). These signals tell a much richer story than whether it sinks or swims.
When the Float Test Is Actually Useful
I don’t want to write the float test off completely — because it does have real value in certain situations. If you’re a newer baker who hasn’t yet learned to read your starter’s visual cues, the float test gives you one more data point to work with. It’s also genuinely useful when you’ve taken your starter out of the refrigerator after a long rest and you’re not sure whether it’s had enough feedings to bounce back. In that case, floating is a pretty good green light.
The bottom line: use the float test as one tool in your toolkit, not the only tool. If your starter floats and also looks, smells, and behaves like it’s at peak activity — great, bake away. If it sinks but everything else looks right, trust your eyes and your nose. You probably have a perfectly ready starter.
The Clear Jar That Finally Lets You See What’s Actually Happening
When you’re doing the float test—or really, any starter feeding routine—you need a jar transparent enough to watch the rise and fall without constantly opening the lid and disrupting fermentation. I spent months squinting through semi-opaque containers, second-guessing whether my starter had actually doubled or if I was just seeing what I wanted to see.
What works
- Crystal-clear glass means you can actually track rise from the side without opening the lid—no more temperature shock to your starter mid-fermentation.
- The tulip shape gives you straight sides for accurate height measurement, which makes it way easier to spot that consistent doubling pattern the float test depends on.
- The lids seal tight enough to prevent evaporation during long feeds, but they’re not airtight—your starter still gets the gentle airflow it needs.
What doesn’t
- They’re glass, so one careless knock on the counter and you’re replacing it—I’ve been there, and it’s both wasteful and infuriating.
- If you forget they’re in the cabinet, they take up actual shelf space; they’re not compact like some plastic alternatives.
I almost gave up on the float test entirely when I realized I couldn’t even see my starter’s activity clearly in my old jar—it felt pointless to test what you can’t observe. The Weck Tulip Jars (1 Liter, set of 2) changed that completely.
This post contains affiliate links. As an Amazon Associate, I earn from qualifying purchases at no extra cost to you.